Tumble Dryer Use and Care Guide
Operating Instructions

- The START button begins drying a selected program (see Start and Programs).
- The HEAT button selects drying temperature (see Start and Programs).
- IN: HIGH heat.
- OUT: LOW heat.
- The PROGRAMS knob sets the program: rotate it clockwise, never counter-clockwise, until the indicator is pointing to the program you want to select (see Start and Programs). The programs knob will advance to the ‘0’ position after the program ends.
Start and Programs
Choosing program
- Plug dryer into a grounded 3 prong outlet.
- Sort your laundry according to fabric type (see Laundry).
- Open the door and make sure the filter is clean and in place (see Maintenance).
- Load the machine and make sure that the items are not in the way of the door seal. Close the door.
- Choose the drying program by checking the Programs table (see Programs) as well as the indications for each type of fabric (see Laundry). - Set the temperature with the HEAT button. - Select a program or drying time by rotating the PROGRAMS knob clockwise.
- Press the START button to begin. During the drying program, you can check on your laundry and take out items that are dry while others continue drying. When you close the door again, press START in order to resume drying.
- About 10 minutes before the program is completed, it enters the final AIR FLUFF phase (fabrics are cooled), which should always be allowed to complete.
- Open the door, take your laundry out, clean the filter and replace it (see Maintenance).
- Unplug the dryer.
Programs |
|||
| Program | What it does... | How to set it... | Note: |
|
Timed Dry up to 170 minutes |
Dries wet clothing that will be ironed, acrylic fibers or small loads (less than 2 lb / 1 kg). |
|
Consult suggested drying times (see Laundry). |
|
Fabric Care Air Fluff |
Heating elements turn themselves off and clothing is cooled down. | This is the final phase of all programs. Approximately 10 minutes before the finish, the knob advances automatically to the Air Fluff phase. After this the clothing is ready to be taken out. | Always allow the dryer to complete this phase. |
|
Fabric Care Easy Iron |
Brief program (approximately 10 minutes) that softens fibers of clothing that is ready for ironing. |
|
Important: This is not a drying program (see below). |
|
Fabric Care Auto Dry |
Regular Cottons, Permanent Press. |
|
Important: If you select LOW HEAT, this program will not dry your clothes. For Acrylic fibers or small loads select Timed Drying. For use with large loads, High Heat Only |
Easy Iron Program
Easy Iron is a short 10 minute program (8 minutes of heat followed by a 2 minute Air Fluff period) which fluffs the fibers of clothing that have been left in the same position/location for an extended period of time. The cycle relaxes the fibers and makes them easier to iron and fold. Easy Iron is not a drying program and should not be used for wet articles of clothing.
For best results:
- Do not load more than the maximum capacity.
| These numbers refer to the dry weight | |
| Fabric | Maximum Load |
| Regular Cotton and Regular Cotton mix | 5.5 lb / 2.5 kg |
| Permanent Press | 4 lb / 2 kg |
| Denim | 4 lb / 2 kg |
- Unload the dryer immediately after the end of the program, hang, fold or iron the articles and put them away. Should this not be possible, repeat the program.
The Easy Iron effect varies from one fabric to the next. It works very well on traditional fabrics like Regular Cottons or Regular Cotton mix, and less well on acrylic fibers.
Laundry
Sorting your laundry
- Check symbols on clothing labels to make sure that the articles can be tumble dried.
- Sort laundry by fabric type.
- Empty pockets and check buttons.
- Close zippers and hooks and tie loose belts and strings.
- Wring out each item in order to eliminate as much excess water as possible.
Do not load dripping wet clothes into the dryer.
Wash Care Labels
Look at the labels on your garments, especially when tumble drying for the first time. The following symbols are the most common:

What not to tumble dry in your dryer:
- • Articles that contain rubber or rubber-like materials or plastic film (pillows, cushions, or PVC rainwear), any other flammable objects or objects that contain flammable substances (towels soiled with hair spray).
- Glass fibers (certain types of draperies).
- Items which have been dry cleaned.
- Items with the ITCL Code (see Special clothing items) . These can be cleaned with special at-home dry cleaning products. Follow instructions carefully.
- Large bulky items (quilts, sleeping bags, pillows, cushions, large bedspreads etc). These expand when drying and would prevent airflow through the dryer.
Maximum load size
Do not load more than maximum capacity. These numbers refer to dry weight:
- Natural fibers: 6 kg max (13 lb)
- Synthetic fibers: 3 kg max (6.6 lb)
Do not overload the dryer as this could result in reduced drying performance.
Typical Weights |
|||
| Clothes | |||
| Blouse |
Cotton Other |
150 g 100 g |
5 oz 3 oz |
| Dress |
Cotton Other |
500 g 350 g |
1 lb 2 oz 12 oz |
| Jeans | 700 g | 1 lb 6 oz | |
| 10 Diapers | 1000 g | 2 lb 3 oz | |
| Shirt |
Cotton Other |
300 g 200 g |
10 oz 7 oz |
| T-Shirt | 125 g | 4 oz | |
| Household Items | |||
|
Duvet cover (Double) |
Cotton Other |
1500 g 1000 g |
3 lb 5 oz 2 lb 3 oz |
| Large Tablecloth |
700 g |
1 lb 6 oz | |
| Small Tablecloth | 250 g | 9 oz | |
| Tea Towel | 100 g | 3 oz | |
| Bath Towel | 700 g | 1 lb 6oz | |
| Hand Towel | 350 g | 12 oz | |
| Double Sheet | 500 g | 1 lb 2 oz | |
| Single Sheet | 350 g | 12 oz | |
At the end of a drying cycle, cottons could still be damp if you grouped cottons and permanent press items together. If this happens simply give them an additional short period of drying.
Special clothing items
Blankets and Bedspreads: acrylic items (Acilan, Courtelle, Orion, Dralon) must be dried with special care on LOW heat setting. Avoid drying for a long period of time.
Pleated or creased garments: read the manufacturer’s drying instructions on the garment.
Starched articles: do not dry these with non-starched items. Make sure that as much of the starch solution is removed from the load as possible before placing it in the dryer. Do not over-dry: the starch will become powdery and leave your clothing limp, which defeats the purpose of starch.
Sample Dry Loads
Sample Load 1: RV Sheet Set
- Wash Cycle: Regular Cotton Heavy Duty
- Dry Time: 70-90 minutes (add 15 min. for std. sheets)
- 1 Flat Sheet (90”x102” / all 230 thread count)
- 1 Fitted Sheet (60”x80”)
- 2 Standard Pillowcases (21”x32”)
Sample Load 2:
- Wash Cycle: Regular Cotton Heavy Duty
- Dry Time: 90-120 minutes
- 3 Pairs Jeans (35” waist / 32” inseam)
- 2 Wash Cloths (13”x13”)
- 1 Pair Boxer Shorts
- 6 Hand Towels (16”x28”)
Sample Load 3:
- Wash Cycle: Regular Cotton Heavy Duty
- Dry Time: 120-140 minutes
- 3 Pairs Jeans (35” waist / 32” inseam)
- 1 Large Sweat Shirt (50% cotton / 50% polyester)
- 2 Pillowcases (21”x32”)
- 2 Wash Cloths (13”x13”)
- 5 Hand Towels (16”x28”)
Times are approximate and can vary depending upon:
- Amount of water retained in clothes after spin cycle: towels and delicates retain a lot of water.
- Fabrics: items that are the same type of fabric but different textures and thicknesses may not have the same drying time.
- Quantity of laundry: single items or small loads may take longer to dry.
- Dryness: If you are going to iron some of your clothes, they can be taken out while still a bit damp. Others can be left longer if you need them to be completely dry.
- Heat setting.
- Room temperature: if the room where the dryer is located is cold, it will take longer for the dryer to dry your clothes.
- Bulk: some bulky items can be tumble dried with care. We suggest that you remove these items several times, shake them out, and return them to the dryer until finished.
Do not over-dry your clothes. All fabrics contain a little natural moisture, which keeps them soft and fluffy.
Cleaning & Maintenance
When you should switch off the electricity
Unplug the dryer when not using it, when cleaning it and during maintenance activities.
Clean the filter after each cycle
The filter is an important part of your dryer: it accumulates lint and fluff that is formed while drying. Small items could also become trapped in the filter. When finished drying, therefore, clean the filter by rinsing it under running water or with your vacuum cleaner. Should the filter become clogged up, the airflow inside the dryer will be seriously compromised: drying times lengthen and you will consume more energy. It may also damage your dryer.

The filter is found in front of the dryer trim (see diagram).
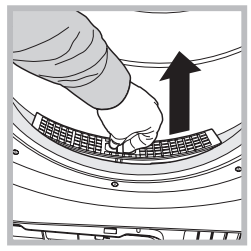
Removing the filter: 1. Pull the plastic grip of the filter upwards (see diagram).

2. Clean the filter and replace it correctly. Ensure the filter is fully located flush into the tumble dryer trim.
Check the drum after each cycle
Turn the drum manually in order to remove small items (handkerchiefs) that could have been left behind.
Cleaning the drum
Do not use abrasives, steel wool or stainless steel cleaning agents to clean the drum. A color film may start to appear on the stainless steel drum, this may be caused by a combination of water and, or cleaning agents such as fabric conditioner from the wash. This colored film will not affect the dryer performance.
Cleaning the dryer
- External parts in metal or plastic and rubber parts can be cleaned with a damp cloth.
- Periodically check the vent tube and any permanent venting fixture to make sure that there has been no accumulation of fluff or lint, and remove it.
- Remove lint that collects around the filter and the outlet vents.
Do not use solvents or abrasives. Your dryer uses special bearing components which do not need lubrication. Have your dryer checked regularly by authorized technicians to ensure electrical and mechanical safety.
Troubleshooting
The dryer won’t start.
- The plug is not plugged into the socket, or not making contact.
- There has been a power outage.
- The fuse has blown.
- The door is not closed securely?
- The PROGRAMS knob has not been set properly (see Start and Programs).
- The START button has not been pressed (see Start and Programs).
Its taking a long time to dry.
- The filter has not been cleaned (see Maintenance).
- The temperature setting is not ideal for the type of fabric you are drying (see Start and Programs, and see Laundry).
- Automatic / Sensor Dry programs require a HIGH temperature setting (see Start and Programs).
- The correct program has not been selected for this load (see Start and Programs, and see Laundry).
- The exhaust duct is obstructed (see Installation).
- The air intake vent is obstructed (see Installation).
- The permanent ventilation flap on the storm cover is obstructed (see Installation).
- The items were too wet (see Laundry).
- The dryer was overloaded (see Laundry).