Installation Instructions and Operating Guide
Installation Instructions
Step 1: The MAXXFAN Dome fan requires a minimum 6 1/4 inch diameter opening. If you are replacing another type already installed, remove the old existing vent. Remove all old sealant for a minimum of 2” entirely around the opening.
Step 2: Prior to installing the MAXXFAN Dome in the opening, apply a continuous strip of BUTYL tape or equivalent to the underside of the flange in the groove provided.

| CAUTION! When installing your MAXXFAN Dome fan, only use a caulking/sealant compatible with the flange (plastic product) and the roof surface. DO NOT use materials containing solvents such as or similar to Xylene, Toluene, Methyl Ethyl Ketone (MEK), Acetate or Acetone as they can damage the flange. Also, Polysulfide (Thiokol) type sealants must be avoided. If in doubt, please contact the manufacturer of your RV. |
Step 3: (Roof Installation) When inserting the MAXXFAN Dome fan into the roof opening:
- orient the fan with the button toward the front of the coach.
- ensure that the fan wires are hanging to the inside of the coach.
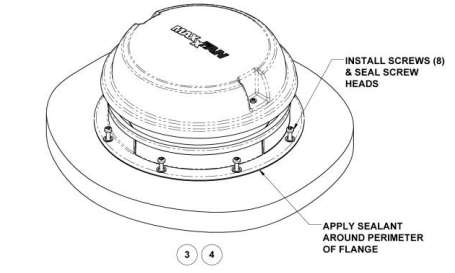
Center the fan in the opening. Using the eight (8) screws provided, attach the flange to the roof at each dimple location along the flange.
| Note: Opening the fan lid gives better access to the flange for assembling the screws. |
Screw into the dimple to pierce the flange, making sure not to overtighten the screws to avoid cracking the flange.
- (Wall Installation) When inserting the MAXXFAN Dome fan into the wall opening:
- ensure that the fan wires are hanging to the inside of the coach.
Center the fan in the opening. Using the eight (8) screws provided, attach the flange to the wall at each dimple location along the flange.
| Note: Opening the fan lid gives better access to the flange for assembling the screws. |
Screw into the dimple to pierce the flange, making sure not to overtighten the screws to avoid cracking the flange.

Step 4: (Roof Installation) After the MAXXFAN Dome fan has been installed, remove the excess BUTYL caulk that may have squeezed out. Using a sealer such as Dicor self-leveling lap sealant or similar caulking, apply a daub over every exposed screw head. In addition, apply a bead (approximately 3/16” dia.) along the outside edge of the flange all the way around the fan.
| Note: The Rain Shield can be installed on the roof. If there is a downward slope, it must be installed with the slots toward the downward slope. |
- (Wall Installation) After the MAXXFAN Dome fan has been installed, remove the excess BUTYL caulk that may have squeezed out. Use silicone to apply a daub over every exposed screw head. In addition, apply a bead of silicone (approximately 3/16” dia.) along the outside edge of the flange all the way around the fan.
- Step 4A: Center the Rain Shield over the fan with the slots facing downward as shown. Using six (6) screws provided, attach the rain shield to the wall at each dimple location along the flange. After the Rain Shield has been installed, use silicone to apply a bead of silicone (approximately 3/16” dia.) to seal around the perimeter of the rain shield. Apply a daub of silicone over every exposed screw head.

Step 5:
- If the roof/wall is thicker than 1 inch the extension sleeve must be used.
- A roof/wall that is 6 inches thick will use the full-length extension sleeve without trimming.
- If the roof/wall is between 1 inch and 6 inches, the extension sleeve may need to be trimmed.
- Measure the distance from the vehicle ceiling/wall to the base of the MAXXFAN Dome fan. Cut the extension sleeve longer than the dimension measured to accommodate the depth of the garnish ring. Refer to table below for additional length required.
| Vehicle Roof/Wall Thickness | Sleeve Length to Cut-off | |
| LED | NON-LED | |
| 6.0 Inch | None (use full length sleeve) | None (use full length sleeve) |
| 1.0 Inch | Not applicable, Sleeve not used | Not applicable, Sleeve not used |

| Vehicle Roof/Wall Thickness | Length to add to Ceiling/Wall Thickness Measurement | |
| LED | NON-LED | |
| 1 1/8 to 5 7/8 inch | 15/16 inch | 1/2 inch |
Step 6: Non-LED MAXXFAN
Dome Using the supplied wire splices, connect the Positive (+) 12VDC supply wire to the MAXXFAN Dome fan wire marked “POS 12VDC” and the Negative (-) 12VDC supply wire to the MAXXFAN Dome fan wire marked “Neg. 12VDC”.
- If the sleeve is needed, insert the sleeve into the garnish ring positioning the notch in the sleeve to line up with the wiring.
- Raise the garnish ring to the ceiling/wall ensuring that the garnish ring is centered over the fan opening.
- If using the sleeve, the sleeve will overlap the base that extends in the opening. This will help center the garnish ring in the opening.
- Ensure that the wires are not pinched. The wires should be routed on the outside of the sleeve. The excess wire should lay in the garnish ring to keep them contained.
- Secure the garnish ring to the ceiling/wall with the four (4) screws provided in the small parts package.
- Reconnect the main vehicle power to the MAXXFAN Dome.

Step 7: LED MAXXFAN Dome
Using the supplied wire nuts, connect the Positive (+) 12VDC supply wire to the MAXXFAN Dome fan wire and the LED light wire marked “POS 12VDC” and the Negative (-) 12VDC supply wire to the MAXXFAN Dome fan wire and the LED light wire marked “Neg. 12VDC”.
- If the sleeve is needed, insert the sleeve into the garnish ring positioning the notch in the sleeve to line up the wiring.
- Raise the garnish ring to the ceiling/wall ensuring that the garnish ring is centered over the fan opening.
- If using the sleeve, the sleeve will overlap the base that extends in the opening. This will help center the garnish ring in the opening.
- Ensure that the wires are not pinched. The wires should be routed on the outside of the sleeve. The excess wire and wire nuts should lay in the garnish ring to keep them contained.
- Secure the garnish ring to the ceiling/wall with the four (4) screws provided in the small parts package.
- Reconnect the main vehicle power to the MAXXFAN Dome.

Operation of your MaxXFan Dome

- To open the MAXXFAN Dome lid push the button on the handle to dis-engage the clip and slide the handle away from you until the clip engages the upper opening.
- To close the lid, push the button on the handle to dis-engage the clip and pull the handle toward you until the clip engages the lower opening.
- Operation of your MAXXFAN Dome simply entails pushing the ON/OFF button on the fan to activate the exhaust fan.
- The optional LED lighting on the garnish ring is operated by the push button on the garnish ring. The LED lighting and fan operate independently
- Close the lid to impede infiltration of air when exhaust fan is not in use.
- The MAXXFAN Dome fan should not be operated with the lid closed.