Texan Grill Owner's Manual
Important Safeguards
- Read ALL instructions prior to using product.
- Do not touch hot surfaces. Use handles or knobs.
- To protect against electrical shock, do not immerse cord or plugs in water or other liquid.
- Close supervision is necessary when any appliances are used near children.
- Allow to cool before putting on or taking off parts.
- Do not operate appliance with a damaged power cord or plug. If the appliance malfunctions, discontinue use and contact the nearest authorized appliance dealer or the factory for examination, repair or adjustment.
- The use of accessory attachments not supplied by the manufacturer of the appliance may cause injuries.
- Do not place on or near a hot gas or electric burner, or in a heated oven.
- Extreme caution must be used when moving an appliance containing hot oil or other hot liquids.
- Do not use appliance for other than intended use.
- Always place a minimum of two (2) cups of water in disposable drip tray prior to grilling.
- Never leave children alone - children should not be left unattended around the grill at any time.
- Allow the grill to cool before taking off cooking grates, disposable drip tray or lids.
- Fuel, such as charcoal briquettes, are not to be used with this appliance.
- Ensure grill is installed per instructions and properly grounded by a qualified electrician.
- Do not replace or attempt to repair any part of the grill, unless otherwise noted in this manual. All other service is to be performed by a factory authorized technician.
- Do not use water to extinguish a grease fire, use dry chemical fire extinguisher.
- Do not store flammable materials near the grill.
- Do not wear loose fitting or hanging apparel when using the grill.
- The appliance is not to be used by persons (including children) with reduced physical, sensory or mental capabilities, or lack of experience and knowledge, unless they have been given supervision or instruction.
| Warning: Charcoal or similar combustible fuels must be not be used with this appliance. |
Before Use
- Before using your grill, remove the cooking grate and drip tray from the grill. Wash the grill with warm soapy water using a non-abrasive cloth. USE ONLY HIGH TEMP PLASTIC UTENSILS WHEN GRILLING. Visit our web site to purchase a set of high quality stainless steel/ high temp plastic grill utensils, www.cookwithkenyon.com.
- Make sure the drip trays are inserted all the way into the bottom of grill and electric element brackets are resting on the element support bracket.
- Cover the bottom of the drip trays with a liquid. Water is fine. PLEASE DO NOT USE A FLAMMABLE LIQUID! Doing so would ruin your cookout. Using apple juice if you are grilling pork adds a nice flavor to the meat. A can of lime soda is wonderful if you are grilling fish. Just remember always add liquid to the drip tray prior to grilling.
- To keep your grill smoke free, always clean the grilling surface after each use. Simply wash with warm soapy water using a non-abrasive cloth or place in your dishwasher. Empty the drip trays and wipe with a damp paper towel. The drip trays can be used multiple times before needing to be replaced.
- Place your cooking grates or optional griddles (part #B96000) onto the element with drip trays installed. Use the griddles for foods such as eggs, pancakes or french toast.
- Preheat grill with lid closed for 5 to 7 minutes on desired heat setting for type of food.
- Steak 7-8 bars
- Hamburgers 6-7 bars
- Chicken, pork and fish 4-5 bars
- Vegetables 3-4 bars
- Close the lid(s) and cook. Enjoy the best grilled food you have ever tasted!
- Clean up. This is easy to do as you will soon learn. After the grill has cooled to the touch, take a few pieces of paper towel and place on the grilling surface. Pour about one ounce of water on the towel and then using your high temperature nylon tongs, swab the paper toweling back and forth to loosen up the residue from your grilling. Throw the paper towel away and wipe the grates off with a dry paper towel.
- Once the grates have cooled sufficiently, remove the grates and place in your dishwasher for a thorough cleaning.
- With the grates removed, lift up the electric elements and remove the drip trays. Empty the contents of the drip trays in an appropriate place, please don’t pour it on your neighbors lawn. Wipe the trays out with a dry paper towel and reuse the trays. The trays can last for several uses.
- After you have used your grill many times, you may want to wash the lids. They can be placed in your dishwasher and run on the pots & pans cycle. This will restore your grill to its original pristine look.
- To clean the grill, first be sure the cooking surface has cooled enough to handle. Then remove the grates, lift up the electric elements until they lock in the up position, remove the middle grate support cross bar, then the drip trays. The grate support cross bar is removed by lifting the rear and pulling the front notch off of the supporting tab. To install the support reverse the procedure. Do not cook on the grate without the support in place!
- Wipe the stainless steel surfaces with a damp cloth to remove any residue from previous grilling sessions.
- Your Kenyon grill came with a sample bottle of stainless steel cleaner. Use this cleaner once a month to protect the stainless.
- The touch control area is ceramic glass which is sealed from the effects of rain, snow and ice. To clean the glass, use a glass cleaner and soft towel. If stains appear, use a ceramic glass cleaner which can be found in your local grocery store.

Operation of Grill
- DO NOT USE WATER ON GREASE FIRES: Smother fire or flame or use dry chemical or foam-type extinguisher.
- USE ONLY DRY POT HOLDERS: Moist or damp pot holders on hot surfaces may result in burns from steam. Do not let pot holder touch the grate or element of the grill. Do not use a towel or other bulky cloth in place of a pot holder.
- DO NOT COOK ON BROKEN GRILL GRATE OR GRIDDLE: If the grate should break, grease and oils may come into direct contact with the electric element and create a risk of electric shock or fire. Contact an authorized service center or KENYON Customer Care immediately at (860) 664-4906.
- CLEAN GRILL WITH CAUTION: If a wet sponge or cloth is used to wipe spills on a hot cooking surface, be careful to avoid steam burns. Some cleaners produce noxious fumes if applied to a hot surface. Read the cleaner label for details prior to using.
- DO NOT TOUCH HEATING ELEMENT OR GRATE: The heating element and grate will be hot for some time after cooking. These components should be allowed to cool and then be handled with care and caution while cleaning, as they may be hot enough to cause severe burns.
- CLEAN GRILL AFTER EACH USE: This appliance is equipped with removable, disposable drip trays. The drip trays MUST be removed and cleaned after each and EVERY use. Do not allow grease to accumulate between cooking. The drip trays and baffle tray MUST be used when cooking on the grill. Excessive grease may spill over into the interior of the grill, voiding your warranty and posing a fire hazard.
- NEVER LEAVE GRILL UNATTENDED AT HIGH HEAT SETTINGS: High heat setting may cause heavy smoking and ignite grease.
- DO NOT CLEAN UNIT WITH PRESSURIZED WATER: Never clean the grill with any form of pressurized water or other types of cleaners. Doing so will void the warranty and may pose a serious risk of electric shock. Always clean the grill with a cloth and a stainless steel or glass surface cleaner.
- STORAGE: Suitable shelter must be provided to prevent direct exposure to rain. Covers available at www.cookwithkenyon.com.
- TO PREVENT SMOKE: To prevent the contents of the drip trays from smoking, place 2 cups of water (or enough to cover the bottom of the pan) in the drip trays before cooking.
- DO NOT USE POTS OR OTHER BAKEWARE ON THE GRILL
Touch Control
 |
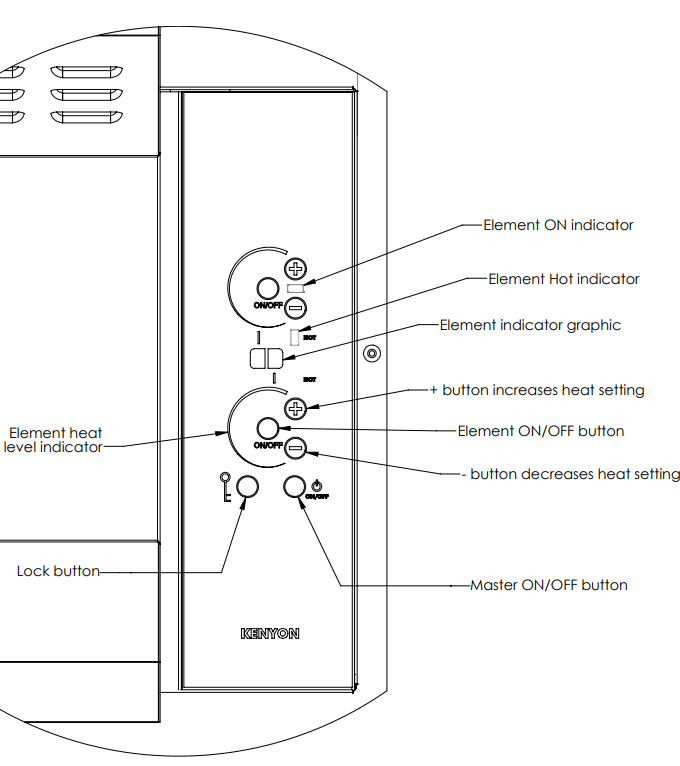
To activate an element, first the master power must be turned on by placing and holding a finger for two seconds over the circular area next to the master power graphic. An audible beep will be heard and a light next to the master power graphic will illuminate. Then the desired element must be turned on, by placing a finger over the circular area marked ON/OFF for that element. The same beep will sound and a light will illuminate. Then the heat level is chosen, by holding a finger over the circular areas marked with + or -. Touching the + first will incrementally set the heat level from settings 1 thru 8 with a beep and corresponding number of lights illuminated. Touching the - first will incrementally set the level from settings 8 thru 1 with a beep and corresponding number of lights illuminated. When the desired heat level is reached the finger is removed and the grill remains at that heat level. If an element is activated, but no heat level chosen, the element will automatically turn off in 7 seconds. To change the heat level place finger on + or - graphic of desired element to change heat level incrementally up or down. To deactivate an element, touch circular area marked ON/OFF to turn the element off. Also the master power ON/ OFF can be touched and the entire grill will be deactivated.
|
|||||||||||||||||||||||||||
 |
Calibaration
|
|||||||||||||||||||||||||||
 |
Heat Settings
|
|||||||||||||||||||||||||||
|
Hot Surface Indicator
|
||||||||||||||||||||||||||||
|
Lock Function
|
||||||||||||||||||||||||||||
|
Turning "OFF" the Grill
|
||||||||||||||||||||||||||||
|
Automatic Shutoff
|
||||||||||||||||||||||||||||
|
Preheat and Auto Shutoff Time
|
|||||||||||||||||||||||||||
|
Temperature Guide
|
|||||||||||||||||||||||||||
Grill Parts
|
Heating Elements
|
|
|
Baffle Tray
|
|
|
Drip Trays
|
|
|
Grates
|
Lid Removal
- The grill lids are removable for cleaning . To remove the lids, open it so the bearing is aligned with the notch in the lidstay. Pull the lidstay toward the center of the grill, over the bearing, releasing the lid from the lidstay mechanism. Then slide the quick release pin out of the middle hinge. (See Fig. 14)
- With the quick release pin removed, grasp the lid, pushing back on the center to clear the middle hinge and slide the lid away from the center of the grill until the outer hinge is free of it’s pivot pin. (See Fig. 15) Once the lid(s) have been removed they can be washed in warm, soapy water. Installation is reverse of removal.
 |
 |
Handle Lock
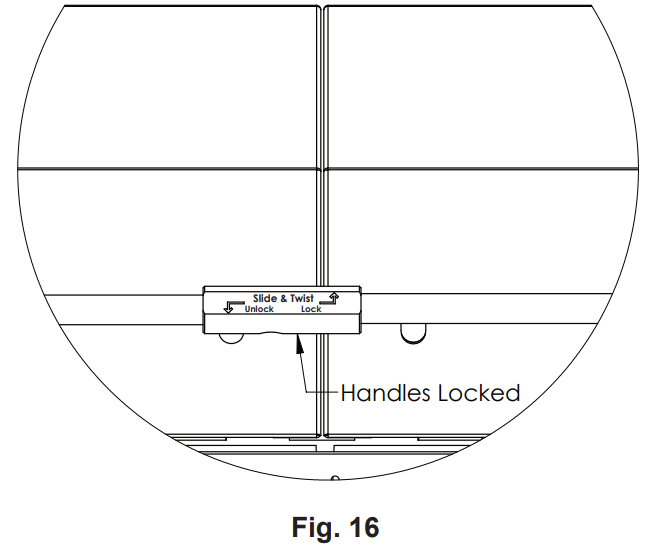
- The handle lock allows the user to lock both lids together for ease of opening and accessing the entire grilling surface. (See Fig. 16)
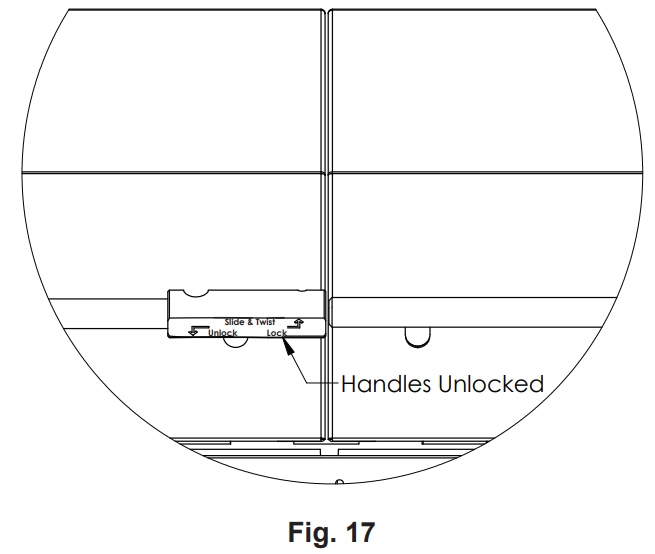
- The lids can also be unlocked and opened individually for access to either half of the grilling surface. (See Fig. 17)
- This is a great feature allowing the user to access only half of the grill, allowing the other half to continue cooking uninterrupted.
 |
 |


