13 Interior Features
Bedspread
As a furnished part of the bedroom suite, a bedspread with matching pillow accessories (Figure 14-1) is included with the motorhome.

The bedspread and pillow shams are “for dry-cleaning only.” As the bedspread was made with materials treated for stain resistance, dry-cleaning will prolong the life of these materials. The curtains in the bedroom are color coordinated with the bedspread and accessories to provide a pleasing décor for the bedroom area.
Flooring
Porcelain tile (Figure 14-2) is standard throughout the motorhome with the exception of the slide-out rooms. For routine cleaning, sweeping or vacuuming the floor would be sufficient. If more thorough cleaning is warranted, the flooring can be cleaned with a damp mop and water. For more stubborn stains, a mixture of soap-free household cleaner (e.g., vinegar, ammonia, or comparable products) and water can be used.

Do not saturate the floor surfaces with water, as this could damage the flooring substrate. Do not use any abrasives (cleansers, scouring pads, and the like) as they can scratch or mar the flooring surfaces and might cause damage to the flooring. If ceramic tile is chosen as an option, it may be cleaned more vigorously than the vinyl flooring.
Overhead Bunk (Optional)
There is always room for one more. Immediately over the cockpit is an optional drop-down bunk. Simply unlatch the two levers and the bunk slowly lowers so the bed can be easily unfolded.

Elevated Bed
 |
|
Standard Elevated Beds – Various Tiffin products are equipped with standard built-in elevated beds or bed loft areas. These beds can be upwards of 4 to 5 feet above the floor level and are often enclosed on one, two, or three sides and sometimes even partially on a fourth side. Because there are so many potential users and different types of elevated bed designs, elevated beds are not equipped with bed rails.
Use of Bed Rails – We feel that you, as the customer, are best equipped to determine if a bed rail system is necessary or best for you based on your intended uses, the actual users of the elevated beds, and the comfort level of the users. For those customers who would prefer using an elevated bed with a bed rail, there are numerous bed rail styles, sizes, heights, and designs available, even in the style of bumpers, which can be purchased at various retail locations and/or on the internet.
When installing a bed rail please make sure that you follow the manufacturer’s installation instructions carefully and that you take in to account the size and height of the mattress (either originally installed by Tiffin or later replaced by you) so that the rails are the appropriate height above the top of the mattress. This is important because residential mattresses differ in size from the RV mattresses originally installed by Tiffin. Please also make sure that the bed rail you select allows for adequate room to get in and out of the elevated bed after installation, especially in the event of an emergency.
Tips for Safe Usage:
- Please use sound judgment when allowing children to sleep in any style of elevated bed. Generally, it is not suitable for children under the age of 6 to sleep in an elevated bed or bed loft area.
- Discuss proper usage of any elevated bed/electric bed lift system with your children and make sure they are supervised if playing in the bedroom/sleeping area of the trailer with elevated beds. Please do not allow horseplay on or under the elevated beds and no items such as hooks, belts, jump ropes, or towels should hang from any part of the elevated bed.
- Place a night light in the bedroom/sleeping area so users can see at night when getting in and out of the beds.
No more than one person should be in an elevated bed at once and make sure you follow the weight restrictions posted on the warning label near the beds.
Heated Tile Floor (Optional)
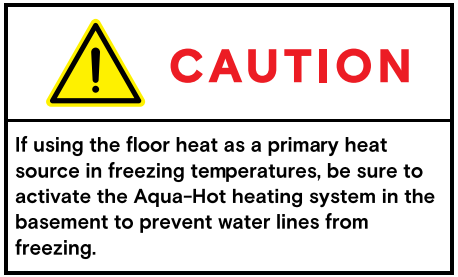
Your Phaeton might be equipped with an optional heated tile floor. The heated tile floor does not heat the air but gently warms the surrounding surfaces and occupants, allowing for a lower thermostat setting than traditional heating methods while providing the same comfort level.
Peak floor temperature is 25-30º above ambient floor temperature.
The system uses a controller (Figure 13-4) that regulates the floor temperature by means of a sensor built into the floor, thus ensuring that the temperature sensed by the controller and the owner are the same.
The optional heated tile floor provides clean, quiet heat, with no blowers or transformers, and it creates no hum or noise. The thermostat makes a quiet clicking as it switches on.
For further operating instructions, refer to the manufacturer’s literature in the Owner’s Information Package.

Ceiling
The ceiling (Figure 14-5) in the Phaeton motorhome is covered with a padded-vinyl headliner, which can be easily cleaned with a damp, soft cloth, and a mild detergent.

Clean around all vent areas to prevent any build-up of dirt, grease, or other accumulations.
Ceiling Fan

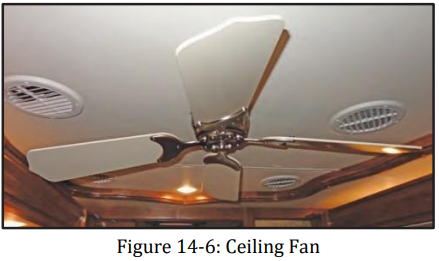
The ceiling fan (Figure 14-6) operates on 12V power and features a two-speed fan (low and high).
There is a switch on the fan itself to allow for the desired rotation, clockwise or counterclockwise.
To change rotation, be sure the main fan switch is in the OFF position.
Window Treatment
Throughout the Phaeton, the window treatments consist of two shades—solar and blackout (Figure 14-7).
The solar shade enables one to see out during the daytime, motorhome. The blackout shade creates complete privacy for nighttime.
The shades are located on all the windows in the living area and the bedroom, as well as in the cockpit.
These manual roller shades are located on all the windows in the living area, bedroom, and bathrooms.
The power shades of the cockpit are controlled by labeled switches on the dash and/or driver and passenger consoles. The shades can be controlled by using the automatic control switch.

Multiplex Lighting Control
The multiplex system (Figure 14-1) enables you to control circuits from multiple locations in the coach. Each switch enables you to turn a circuit ON or OFF with individual button presses, and provides an indicator light to determine the status of the circuit (ON or OFF). Many of the circuits are also dimmable by holding the button to dim.

Additional features of the multiplex system include the following:
- Master Feature (this is only on the control panel located at the entrance door) — Enables you to turn all lighting circuits ON or OFF by pressing a single button labeled Light Master. Pressing the Light Master OFF switch will turn off all the interior lights within the coach. Pressing the Light Master ON switch will turn on the same circuits that were on when the Light Master OFF switch was pressed. All Light Master OFF remembers that were on when the switch was pressed will turn back on when the Light Master ON switch is pressed again. Holding the Light Master ON switch will turn on all interior light circuits.
- Switch Panel Backlighting — All of the switches are backlit to make the labels easy to read. If you desire to turn the panel lights off, a switch is conveniently located at the center of the coach labeled Panel Lights, which enables you to turn the back lighting ON, OFF, or DIM.
- Status LED Indicator — A green LED beside each switch indicates whether the load is on or off. In some cases, certain switches such as Awnings, Compartment Locks, and Generator do not have a status indicator at the switch.
- Dimming Circuits — Certain circuits within the coach are dimmable. To dim a light down, hold the OFF switch until the light is at the desired level, and release the switch. This setting will be remembered the next time the circuit is turned ON. To adjust the light up, hold the ON switch until the light is at the desired level, and release the switch.
