05 Major Appliances
Residential Refrigerator
The Phaeton is equipped with a 110 volt style residential refrigerator (Figure 5-1), which is powered from an outside source, or from the unit’s generator or inverter, which uses a 12 volt battery power supply. This unit operates as most home refrigerators do.

| NOTE: While traveling, the refrigerator will be powered by the inverter. |
For further operating and maintenance instructions, refer to the operating booklet found in the Owner’s Information Package.
| NOTE: While traveling, the 12 V battery is charged by the engine alternator. |
The inverter must be ON for the residential electric refrigerator to operate, if not connected to shore power, or if the generator is not running.
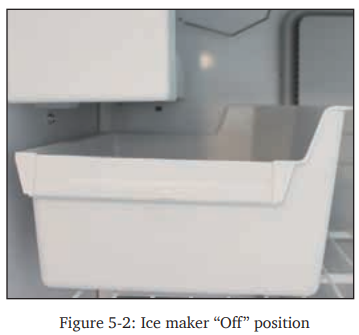
Ice Maker
Your ice maker (Figure 5-2), is equipped with an automatic shut off. As ice is made, the ice cubes will fill the storage tray, raising the shutoff arm to the OFF position. Do not force the wire shut off arm up or down.
- To turn ON the ice maker, lower the wire shutoff arm.
- To turn OFF the ice maker, lift the wire shutoff arm to the OFF position (arm up) until it clicks.
| NOTE: The ice maker must have RV antifreeze cycled through it for proper winterization. |
Microwave/Convection Range
The Phaeton contains a microwave/convection oven (Figure 5-3). All microwave ranges operate on 120 volt AC electrical power, supplied either by the external electrical hookup or by the onboard electrical generator in the motorhome.

Touchpad controls are used for operating the convection microwave (i.e., cooking temperature, mode, power level, and cooking time). For basic operating instructions, care, and maintenance for the proper use of the microwave, refer to the specific manual in the Owner’s Information Package.
In the Phaeton, the “exhaust” or airfiltration fan (Figure 5-4) is built into the microwave and its function is to filter the air and exhaust to the outside.
The filtration fan must be used whenever cooking is performed to filter any airborne cooking residues and heated air.

The filtration system can be used as supplemental filtration of other odors and gases including tobacco smoke, candle fumes, and related vapors. It contains filters which can be removed and cleaned or replaced to assure normal operation. Consult the particular owner’s manual contained in the Owner’s Information Package.
Oven and Cooktop
The Phaeton may be equipped with a standard recessed three burner cook top or it may have an optional, three-burner, recessed cook top with oven.

Do not attempt to adjust the oven pilot light as it has been factory-adjusted and factory-set. To extinguish the oven pilot light when use of the oven is concluded, push inwards on the oven control knob and turn that knob clockwise (CW) to the “off” position.
It is wise to have a qualified service technician periodically check the entire LP-gas distribution system in the motorhome. Scheduling such an inspection annually would be a recommended, preventive-maintenance routine for each motorhome owner.
Lighting top burners with spark ignition
A. Turn the burner knob counter-clockwise to “ON” or “LITE”
B. Turn the Spark knob clockwise one click. If the burner fails to light, continue turning the SPARK knob clockwise until the burner lights.
C. To extinguish the top burner flame, turn the burner knob clockwise to OFF
Lighting the oven pilot
A. Push in oven control knob and rotate counter-clockwise to PILOT ON - PUSH/HOLD.
B. Push the knob in and hold it in while holding a lit match under the oven pilot located near the back of the oven under the broiler shelf and to the right of the oven burner
C. Continue to hold the oven control knob in for five seconds after pilot is lit.
D. Set the oven control knob to PILOT PUSH/HOLD to maintain the pilot flame. The oven and broiler are now ready for operation.
E. To extinguish the pilot, push the control knob and rotate clockwise to OFF
Lighting the oven burner
A. Light the oven pilot as described under “Lighting the oven pilot”
B. With the oven control knob set to PILOT PUSH/HOLD, push in and rotate the knob counter clockwise to the desired temperature setting or to BROIL. The oven will pre-heat in about 15 minutes.
C. To extinguish the oven burner, rotate the knob clockwise to PILOT PUSH/HOLD. The oven pilot will remain lit.
D. For complete shutdown, push in and rotate the knob clockwise to OFF.
Induction Cooktop (Optional)
The Phaeton might be equipped with an optional two-burner induction cook top that requires 50 amp service or the generator to operate.

The control panel features options on operating the following settings:
- HEATING — This is the default function of the induction cook top. When pressing ON/OFF, the heating light will illuminate and the cook top will heat the cookware at 1200 W. The heat can be adjusted by touching the UP or DOWN arrows. There are 10 levels of power, with 10 being the highest.
- TEMPERATURE — When pressing TEMP, the induction cook top will begin setting the temperature and the TEMP light will illuminate. The default temperature is 248 degrees Fahrenheit (120 degrees Celsius). The temperature can be adjusted by touching the UP or DOWN buttons.
| NOTE: The temperature range is 140 degrees to 464 degrees (60 to 240 degrees Celsius). |
- TIMER — When pressing TIMER, the light of the TIMER and one of the lights on HEATING/TEMP will illuminate accordingly. The cook top will enter the Time Setting mode. Five seconds after setting, the window will automatically shift to the mode display of the corresponding function. To view the countdown time, press TIMER again. The display window will show you the remaining time.


Dishwasher (Optional)

The Phaeton might be equipped with an optional compact dishwasher (Figure 5-7). The following operating instructions can be used to operate the dishwasher:
- Load the dishes.
- Add any detergent and rinse-aid solution.
- Press the POWER button to turn the dishwasher ON (pushing this button again will turn the dishwasher OFF).
| NOTE: Opening the dishwasher will automatically turn ON the dishwasher for a 30 second period. To end a wash cycle before it is fully completed, press the POWER button; the dishwasher will pump any remaining water in the dishwasher out of the unit. |
- Select Wash Program. By pressing the PROGRAM button, the desired wash cycle can be selected. The dishwasher will remember the last selection made until a newer one is selected.
- Check to ensure that the drain filter is flush with the filter plate and the spray arm can rotate within the dishwasher freely without impacting anything.
- Start the dishwasher by closing the dishwasher door; then press the START/PAUSE button to begin the washing cycle. This button also has a DELAY START function.
- Pause the dishwashing cycle, if desired, by pressing the START/PAUSE button; wait for three beeps to be heard, and then open the dishwasher. Restart the dishwasher (after closing the door) by pressing the START/PAUSE button.
| NOTE: Forcing open the dishwasher door mid-cycle might cause damage and/or injury. |
- Finish the dishwashing cycle by noting when the dishwasher beeps six times to indicate the end of the wash cycle. At the end of the washing cycle, the drying fan will continue to run for a predetermined time or until the door is opened. The drying fan assists in drying the washed contents and actually uses very little electrical energy in the process. It is normal for some water to remain in the drain filter area after the wash cycle is completed.
| NOTE: Should a power failure occur when the dishwasher is operating, the dishwasher will stop. It might be impossible to open the dishwasher, depending on where it was interrupted in the dishwashing cycle. When the power is reapplied, the dishwasher will resume its operation at the point at which it was interrupted. When not in actual use, the dishwasher can be used to store dishes, cups, glasses, etc. as the dishwasher itself provides secure storage for these items while in transit. |

To ensure that the dishwasher is properly locked for travel, follow the steps below:
- Push the center control located on the face of the dishwasher until it blinks green. Press the key button to the right of the center button until it turns red and compresses. This denotes that the dishwasher is in “lock down” mode.
- To decompress the dishwasher, push the key button for five (5) seconds.
Stacked Washer/Dryer (Optional)
Your Phaeton might be equipped with an optional stacked washer/dryer (Figure 5-8). The optional stacked washer/dryer can operate on 30 or 50 amp service.

It is not recommended to operate the washer or dryer while traveling as this could damage internal components.
For specific information regarding the use of the stacked washer/dryer, consult the owner’s manuals found in the Owner’s Information Package.
NOTE: The 1 ½” gray-water valve at gray tank waste gate must be fully open when operating the washer/dryer.