08 Leveling
TRUELINE LEVELING SYSTEM
VDC00457 TIFFIN
Safety Instructions
Warning
• Do not use the vehicle’s suspension to support the vehicle for servicing or inspection. Instead, install adequate blocking before working under any vehicle. The system is designed as a 'leveling' system only.
• Keep people clear of coach while leveling system is in use.
Caution
• Read and understand all operators’ manuals before using or servicing your leveling system.
• Ensure that the area around the vehicle is clear of obstructions before operating the leveling system.
• Your leveling system should be serviced only by qualified personnel.
• Leaks in a vehicle's air system can cause the vehicle to lower over time regardless of whether or not the leveling system is operational.
Overview
The leveling and electronic ride height system uses electronics to control the air suspension for ride control when traveling, and to control the air suspension for leveling when stationary.
The stationary leveling features have both an automatic and manual mode. Auto mode levels the coach using the air suspension with a single command. Manual mode allows each corner to be individually raised and lowered to manually level the coach. Manual mode can be used with confidence, as the system does not allow the coach chassis to be twisted beyond allowable limits.
When traveling, the ride height of the vehicle can be adjusted. Normal ride height is automatically selected by default. However, the ride height of the coach can be raised or lowered as needed. For example, high-ride may be selected to negotiate uneven terrain; likewise, low-ride may be selected to give additional clearance to the top of the vehicle.
This document explains the features of the suspension control system, and is intended to be used in conjunction with the Graphical Instrument Cluster (GIC) operation guide.
For instructions on using other features of the GIC, please refer to the GIC operation guide.
Selecting Menu Items
When using the rotary knob:
• Rotate the knob to highlight an item.
• Press the knob to confirm your selection.
Operation
The Trueline Leveling System is controlled with the graphical instrument cluster (GIC) interface. There are three main leveling operating modes – auto level mode, manual level mode, and travel mode.

The Trueline Leveling System is on when the ignition is on. The leveling mode and status are displayed on the GIC.
This manual describes all functions available on the leveling popup screen (accessed by selecting More on the main GIC display).
Please refer to the GIC operation manual for information on using the other leveling functions available on the main GIC display.
Auto Level Mode
Auto mode can be used to level the vehicle automatically when the vehicle is stationary. This mode is the easiest leveling method to use and is suitable for most leveling situations.
Manual Level Mode
Manual mode allows the operator to raise or lower each corner of the vehicle individually with the air suspension. Up to two corners can be operated at the same time, or all corners can be raised or lowered at once.
Manual mode can be used when the ignition is on or off, and when the vehicle is traveling at low speeds (up to 5 mph).
Travel Mode
Travel mode is operational when the vehicle is in motion. By default, this mode will initiate when the park brake is released, or when the vehicle begins moving. However, it is best for the operator to enter this mode before the vehicle begins moving to allow time for the vehicle to achieve ride height.
Because the Trueline Leveling System collects information on the ground speed of the vehicle, the operational mode may change automatically depending on the state of the vehicle. For instance, in manual mode, the coach can be driven up to a speed of 5 mph, but if the speed increases, the system will switch to travel mode.
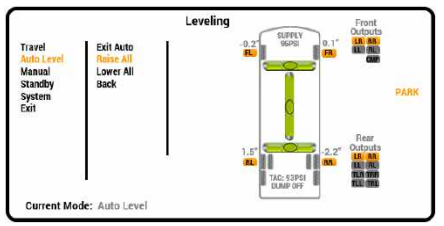
Level Indicator
In auto and manual mode, the three level indicator displays can be viewed as a builder’slevel. The bubbles move to the center once that axis is level.

In this example, the front axle is high on the right side, the front of the vehicle is high, and the rear axle is level.
Output Display
The outputs display on the right indicates which valves are active during any leveling operations. Active valves are shown in orange.

In this example, the front raise valve is active. This is indicated both on the coach display and in the outputs display at the right.
Auto Level Mode
Auto level mode automatically levels the vehicle using the air suspension.
When Auto mode is activated, the leveling system detects the lowest corner of the vehicle, and then levels (lowers) the remaining corners to it. If the system determines that it is unable to lower the vehicle to level, any corners that are low will then be raised to the level of the highest corner.
Using Auto Level
1. Ensure that:
• The ignition is on and the air system is at full pressure.
• The park brake is engaged.
• The front wheels are straightened.
2. Select Auto Level. This initiates a leveling cycle. The leveling status is displayed on the bottom of the screen.

Note: The sensitive leveling sensors require that vehicle movement is kept to a minimum during the leveling process. Therefore, if you are inside the vehicle while it is leveling, please sit still or walk lightly.
At any time during the leveling process, it is possible to stop, or go into manual leveling mode.
1. With Auto Level active, navigate to the next menu.
2. Select Exit Auto to stop leveling. To exit this menu without stopping the air auto leveling process, select Back.

Auto Leveling Cycle
The leveling mode is indicated at the bottom of the screen.
The Trueline Leveling System begins by finding the lowest corner of the vehicle. It then lowers the other three corners until the vehicle is level. As the vehicle lowers, it monitors the suspension height. If it reaches the minimum height, it will stop lowering the high corners and begin raising the low corners until the vehicle is level.
Once the auto leveling process completes, the vehicle should be level and the system will go into low power mode.
Once the Vehicle Has Been Leveled
The leveling system stores the electronic ride height of the vehicle, measured using the ride height sensors.
After 20 seconds, the leveling system enters “low power” mode indicated by the Auto Air LP status on the display. Once the ignition is turned off, the leveling system will go to sleep.
After a period of time (2 hours default) in low power mode, the leveling system automatically wakes up and checks to see if re-leveling is required.
• If no leveling is required, the system goes back to sleep.
• If leveling is required, the Trueline Leveling System returns the vehicle to the previously stored leveled height.
Auto Mode – Notes
Once leveling has been completed, additional leveling cycles can be performed if the system is in auto mode or auto low power mode.
To perform another auto level cycle:
• Select Auto Level > Exit Auto to stop leveling and start another level cycle.
• Select Back to stop leveling without starting another level cycle.

If the park brake is released while in auto mode, the Trueline Leveling System will switch to manual mode and then to travel mode, if the vehicle accelerates to a speed above 5 mph.
Changing the Height of a Leveled Vehicle
A leveled vehicle can be raised or lowered to adjust the entry doorstep height.
1. To ensure there’s an adequate amount of air, the ignition should be on and the air system should be at full pressure.
2. Select Auto Level > Raise All or Lower All.
This causes the vehicle to move up or down while staying level.
If the Vehicle Cannot be Leveled
If the leveling system is unable to level the vehicle, the SLOPE status is displayed and the system goes into low power mode. If this happens, the system has determined that it would need to exceed the factory set height limits to level the vehicle.

Auto Level can be selected to try leveling again, but if the SLOPE status is displayed again, it is not possible to fully level the vehicle on this surface and the vehicle should be moved to a more level surface.
Auto Level – Jacks Auto
The auto hydraulic leveling mode uses the hydraulic jacks to level the vehicle.
Using Auto Level – Jacks Auto
1. Ensure that:
• The ignition is on and the air system is at full pressure.
• The parking brake is engaged.
• The front wheels are straightened.
2. Select Auto Level > Jacks Auto. This initiates a leveling cycle. The leveling status is displayed on the bottom of the screen.

Note: If the system will not go into jacks auto mode, it is most likely because the vehicle’s parking brake has not been applied, the vehicle is in gear, the ignition is off, or the hydraulic jacks are not fully retracted
At any time during the leveling process, it is possible to stop, or go into manual leveling mode.
1. With Auto Level Jacks active, navigate to the next menu.
2. Select Exit Auto to stop leveling. To exit this menu without stopping the leveling process, select Back.

Auto Jacks Leveling Cycle
The leveling status is indicated at the bottom of the screen.
The suspension airbags are deflated and the vehicle is lowered. The jacks lower on the low side of the vehicle, and then on the other side.
The lateral (side-to-side) level is adjusted on the vehicle’s front, and then on the vehicle’s rear. The longitudinal (end-to-end) level is adjusted. These three procedures are repeated until the vehicle is level.
Select Exit Auto to stop all leveling actions and put the system into manual jacks mode. Select Manual Jacks to go to the manual leveling screen.
Auto Level – Combo Auto
Combo leveling levels the vehicle using both the suspension air bags and the jacks. It uses an enhanced leveling algorithm that levels with air while lowering the air suspension to the ground, and then completes leveling using the jacks.
Using Auto Level – Combo Auto
1. Ensure that:
• The ignition is on and the air system is at full pressure.
• The parking brake is engaged.
• The front wheels are straightened.
2. Select Auto Level > Combo Auto. This initiates a leveling cycle. The leveling status is displayed on the bottom of the screen.
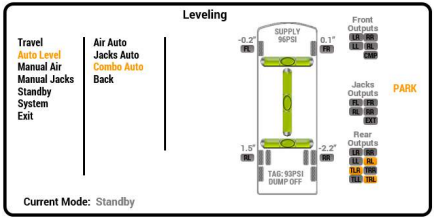
Auto Combo Leveling Cycle
During the combo leveling cycle, the vehicle is lowered and leveled with the air bags, and at the same time, the jacks are extended to the ground.
Once the leveling system detects that the jacks have contacted the ground, it stops lowering using the air bags, and finishes any fine adjustments using the jacks.
Once the Vehicle Has Been Leveled
Once hydraulic and/or combo auto leveling has completed, the ignition can be turned off. The leveling system will go into sleep mode to minimize parasitic current draw on the vehicle’s battery system.
The leveling system does not wake up to relevel when in hydraulic or combo auto mode, as the hydraulic jacks should keep the vehicle level for extended periods of time.
Manual Level Mode - Air
Use manual leveling mode to manually adjust each corner of the vehicle. The vehicle can also be lowered or raised by using the All Lower/All Raise command.
Using Manual Level Mode - Air
Ensure that the vehicle is either parked (but still running) or traveling slower than the manual mode speed limit (5 mph).
If the vehicle is parked, make sure the front wheels are straight.
Note: The Brake indicator will flash if the park brake is set but the vehicle is still in gear. Once the vehicle has been put in neutral with the park brake on, the Brake indicator will stop flashing and remain lit.

1. Select Manual Level Air.
2. Select the corner(s) you wish to adjust.
3. Select Raise or Lower.
4. To control all four corners simultaneously, use All > Raise or Lower. This can be useful to adjust the entry step height.
5. To exit the menu, select Previous.
Manual Level Mode – Jacks
In manual jacks leveling mode, each corner of the vehicle can be raised or lowered individually, or two can be raised or lowered at the same time. All > Raise and All > Lower can be used to raise or lower the entire vehicle.
Note that unlike manual air mode, manual jacks mode can be used only when the vehicle is stationary, with the ignition on and the park brake set.
Using Manual Level Mode – Jacks
1. Ensure that:
• The ignition is on.
• The vehicle is in ‘Park’ or ‘Neutral’ and the parking brake is engaged.
• The front wheels are straightened.
Note: The Brake indicator will flash if the park brake is set but the vehicle is still in gear. Once the vehicle has been put in neutral with the park brake on, the Brake indicator will stop flashing and remain lit.
1. Select Manual Jacks.
2. Select the corner(s) you wish to adjust.
3. Select Raise or Lower.
4. To control all four corners simultaneously, use All > Raise or Lower. This can be useful to adjust the entry step height.
5. To exit the menu, select Previous.
All Raise, All Lower
In manual mode, the entire vehicle may be raised or lowered while either parked or moving slowly. To control all four corners simultaneously, use Manual Air > All > Raise or Lower.
All Raise – Lock On
To allow greater freedom, All > Raise has a lock feature that keeps the function activated after the rotary knob is pressed for 3 seconds.
In manual mode, navigate to All > Raise and press rotary knob for 3 seconds. This ‘locks’ the function on for a period of one minute.

• During this time, the vehicle raises continuously and the control panel sounds a repeated beeping tone.
• After one minute is over, the vehicle stops raising.
• The process may be repeated until the vehicle is at the desired height.
• To stop the raising process during the one-minute period, briefly select one of the other manual raise or lower functions.
Manual Mode – Notes
• In manual air mode, if the vehicle begins to move, the Trueline Leveling System automatically switches from manual mode to travel mode at speeds higher than 5 mph.
• If the Trueline Leveling System detects an excess amount of twist in the vehicle frame during the manual adjustments, the TWIST status will be displayed. Any further actions that may cause more twist are not permitted by the system.
• Also, if the system detects that the height of a corner is exceeding the factory set height limit (high or low), then the corner will not raise if too high, or lower if too low.

For example: If the vehicle is in a state as indicated at right, the leveling system will not allow the right front to be raised, the left front to be lowered, the left rear to be raised, or the right rear to be lowered.
Manual Override
It is possible to override the twist limits when manually leveling. This should be done only if absolutely necessary, as damage to the chassis could occur.
1. In the Manual menu, select Override. A warning will be displayed.
2. If you are certain that you wish to proceed, select Enable Override Mode.

3. Proceed with manual leveling. A status message at the bottom of the display indicates that you are in manual override mode.
4. To exit manual override mode, select Override. The TWIST/LIMITS OVERRIDE message will disappear.

Travel
Travel Mode (Ride Height)
Travel mode is the operational mode used when the vehicle is in motion.
This mode controls the vehicle’s air suspension system. There are three factory-defined levels:
• High Ride
• Low Ride
• Standard Ride
The leveling system can only be switched to travel mode if the ignition is turned on. Switching to travel mode causes the suspension to go to ride height.
Using Travel Mode
1. Turn on the ignition.
2. Select Travel. The default setting is Standard ride height.
3. Select the desired travel height.
• High Ride assists in negotiating uneven terrain.
• Low Ride allows additional clearance to the top of the vehicle.
• Standard Ride is the normal ride height.

High Ride and Low Ride may be used only under predefined speeds. At higher speeds, the vehicle will go to standard ride height, and High Ride and Low Ride options will not be available. The maximum speeds at which low and high ride can be maintained are set by the manufacturer.
When the Trueline Leveling System is in Standby or Auto mode, it will automatically switch to Travel mode if the park brake is released. When the Trueline Leveling System is in Manual mode, it will stay in Manual mode when the park brake is released, and will switch to Travel mode if the vehicle speed exceeds 5mph.
If the park brake is released before travel ride height is reached, the system will sound a tone every second until the normal height is achieved, or until the park brake is set.
Warning: The time required to achieve ride height varies with vehicle design. It is the operator’s responsibility to ensure that the vehicle is at an adequate height before driving. If the vehicle is too low, severe damage can result to the fenders when the wheels are turned.
Travel Mode – Notes
• When travel mode is entered from auto or manual mode, a tone will sound until ride height is achieved. It will also sound if high ride, low ride or standard ride mode are set, and will continue until the desired ride height is achieved. It is strongly advised not to move the vehicle while the tone is sounding. It is also unadvisable to negotiate uneven terrain while in low ride.
• Unlike mechanical ride height systems, the automatic ride height system is intelligent, and therefore will not attempt to make ride height corrections while the vehicle is cornering or braking.
Low Ride Height Warning
A tone (one long beep per second) will sound if:
• The vehicle’s ride height is below a predefined limit, and
• The system is in manual or travel mode, and
• The park brake is off.
This indicates that the suspension is below a safe height and fender damage could occur when turning the wheels.
Tag Dump (if equipped)
Normally, the tag axle dump is controlled automatically by the vehicle situation.
With Manual Tag Dump, the tag air bag pressure can be reduced at low speeds (typically under 20 mph) to transfer the weight from the tag axle to the rear drive axle.
This results in decreased tag axle tire drag while turning, and increased traction in low grip conditions.

Using Tag Dump
1. In travel mode, select Tag Dump while stationary or at low speeds to deflate the tag axle air bags.
2. If Tag Dump is selected again or the vehicle speed increases above the low speed threshold, the tag axle air bags will inflate.
Tag Axle Air Bag Control
In travel mode, the tag axle air bag pressure is monitored with a pressure transducer. The tag raise and lower valves are activated to maintain tag axle air bag pressure.
In auto or manual modes, the tag axle raise and lower valves are operated together with drive axle raise and lower valves.
System Commands
Various system commands can be accessed by navigating to the System menu.
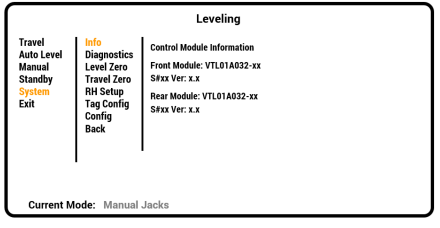
Info
The Info screen displays part numbers for the leveling system components. This screen is used mainly by service personnel under the guidance of Valid’s technical support staff.
Diagnostics
The Diagnostics screen displays any current diagnostic messages within the leveling system.
The vehicle operator will be alerted to any diagnostic messages by the presence of this icon on the main (More) screen: 
The diagnostic messages are displayed in the order of occurrence.

Warning: If the TROUBLE indicator is on, the suspension may be inoperative. DO NOT DRIVE the vehicle and call for assistance.
Note: If you contact the service department about a diagnostic message, first write down the information displayed, for all diagnostic messages present. This will help them diagnose the problem if the message list has been cleared in the meantime
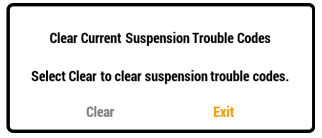
Clearing Diagnostic Messages
To clear any diagnostic messages, navigate to an item in the Diagnostics menu.
• Select Clear to clear.
• Select Exit to exit the dialog without clearing the messages.
Low Battery
If the chassis battery voltage is low, the rear module sends a message to the GIC. If the operator attempts to switch out of any other mode into Auto Level Jacks mode while the voltage is low, a message is displayed at the bottom of the screen indicating that the current mode cannot be switched. Instead, the system is switched into standby mode.

The following System screens are used mainly by service personnel under the guidance of Valid’s technical support staff.
Level Zero
The Level Zero screen allows you to adjust the level reference used when the vehicle is in auto leveling mode. The system uses the level reference when in auto or manual mode to level the vehicle when parked on unlevel ground.
Travel Zero
The Travel Zero set screen allows you to set the accelerometer reference used by the suspension control system when the system is in Travel mode.
RH (Ride Height) Setup
The RH (Ride Height) Setup screen puts the suspension control system in a constant height adjustment mode. This allows the adjustment of the ride height sensors to set the normal vehicle travel height.
Tag Setup (if equipped)
For vehicles with a tag axle that is controlled by the Trueline Leveling System, the Tag Setup screen allows the adjustment of various parameters relating to tag pressure.
Config
The Config screen provides access to the leveling system configuration settings.
Status Messages
The Suspension/Leveling screen can display a number of messages and alerts. These are located at the right of the level display, in orange.
Twist
If the TWIST indicator is on, the twist limits have been reached during manual leveling. To recover, either perform an automatic level, or manually raise or lower the low or high corners to un-twist the vehicle.
Note: The system will prevent either a manual raise or lower of a corner if that direction increases the twist beyond the allowable limit.

Park
The park indicator illuminates if the park brake is on. It flashes if an attempt is made to level the vehicle without the park brake engaged.
Slope
If the SLOPE indicator is on, leveling is not possible because the ground has excess slope. Move the vehicle to another location. See page 9 for more information.