09 The Water System
The Fresh Water System
Please note that this water is not potable(i.e. suitable for drinking), so use only for bathing, washing and toilet flushing. You should purchase bottled water for drinking.

You may set your fresh water system for either a city water connection of your onboard fresh water supply (Image 85.1)
Campsite Water Hook-Up (City Water)
With a campsite water hookup, you will have an unlimited supply of fresh water for bathing, washing and toilet flushing. You should keep in mind however , that all of the water that is used goes into your wastewater holding tanks.
Because of this, you will need to check the monitor panel for water and waste water levels on a regular basis.
To use a campsite water hookup, connect one end of your fresh water hose to the campsite water faucet and the other end to your motorhomes city water connection and then open the campsite faucet 1/4 turn.
If the campsite water pressure is too high, you will need to install an in-line water pressure regulator (usually available at the campground or a local RV dealerships parts department).
On-Board Fresh Water System (Tank and Pump)
Your on-board fresh water system consists of a water pump and fresh water tank. To fill the fresh water tank, open the cap on the fresh water tank fill and slowly fill the tank until it is full.
The fill cap may be behind a door on the motorhome exterior and is labeled "Water Tank Fill" or "Potable Water". Be careful not to have too much pressure, as the water tank must self vent while filling.
The Water Pump
Make sure that there is water in your fresh water tank. Then turn on the water pump with the switch located on the monitor panel. The pump will pressurize the system and make the water flow.
The pump runs on 12V electricity from the coach battery(ies). The pump is an "Ondemand" type and as soon as the system is pressurized the pump will shut off. However, when you are through using water, you should turn the water pump switch off.

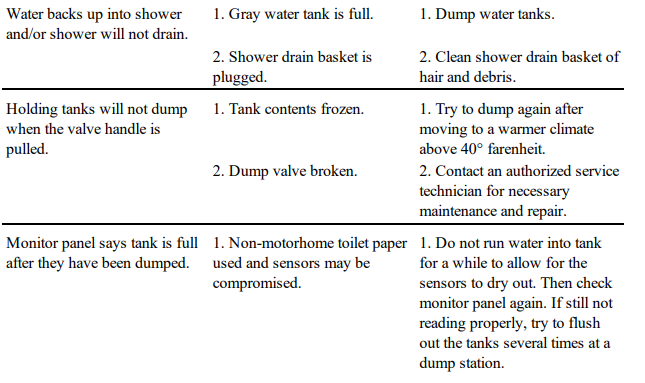
TROUBLESHOOTING THE FRESH WATER SYSTEM

The Waste Water System
Your motorhome has two wastewater holding tanks; a gray water tank and a black water tank (Image 88.1). The gray water holding tank collects the wastewater from the kitchen and bathroom sink as well as the shower.

The black water holding tank is mounted under the motorhome, directly beneath the toilet and collects all wastewater from the toilet.
Please observe your monitor panel for the level of your tanks. Your monitor panel will indicate when the tanks are getting full. You will have to manually empty the waste tanks by connecting the sewage hose supplied with your motorhome.
REFER TO "DUMPING THE HOLDING TANKS"
The Motohome Toilet
Your motorhome toilet (Image 88.2) is a fresh water system. To use it, you must turn "ON" the water pump or connect to a campground water supply.
Before using the toilet, fill the bowl at least 1/2 full with water. To fill, press the toilet pedal 1/2 way down.

To flush the toilet, press the pedal all the way down. Make sure all of the waste and paper have cleared the bowl before releasing the pedal.

CAUTION: Never flush paper towels, facial tissue, feminine products into the toilet. These items will clog the tank drain. If a backup occurs, fill the bowl with hot water and allow to stand. The blockage should dissolve shortly. NEVER attempt to unclog the motorhome toilet with caustic chemicals. They will damage the toilet mechanism.
Dumping the Holding Tanks
Remove the sewer hose from the exterior storage compartment (Image 89.1).
Remove the dust cap from the dump valve drain outlet and connect the sewer hose. Make sure the hose is firmly attached.
Place the plain end of the sewer hose at least six inches into the dump station disposal opening.

Open the larger (black tank) dump valve first by pulling the valve handle straight out. This will release the sewage from the black water tank. Wait until the fluid has completely drained.
Now pull the smaller of the two handles (gray tank) to release the liquid from the gray water tank. The gray water will help to flush out the sewer hose.
Close the dump valves and remove the dump hose.
Rinse the sewer hose thoroughly with water and stow the hose back in the exterior storage compartment.
While depressing the toilet pedal all the way down to open the flush valve, add motorhome waste chemical through the open hole directly into the black holding tank. You may use either a chemical packet purchased in the outdoor section of any camping store, RV dealership or the like. This chemical reduces odor by breaking up the solid waste.
Add several gallons of fresh water to the black tank by holding the flush pedal all the way down for about one minute. This water will help prevent waste from clogging the black water dump valve.
REMEMBER: NEVER DRIVE THE MOTORHOME WITH THE WASTE DRAIN OPEN OR WITH THE CAP OFF.
CAUTION: If you are camping and are able to leave your sewer hose hooked up, please keep the tank valves closed. Open the valves only for dumping and then promptly close them again.
Only dump after the tanks are 3/4 full so there will be ample pressure. If you simply leave the valves open, solid waste will settle and your waste tank will become clogged.
TROUBLESHOOTING THE WASTEWATER SYSTEM