MAXXFAN Operating Guide
Access the complete PDF here: Installation Instructions and Operating Guide
Installation Instructions
Step 1
- MAXXFAN requires a 355mm x 355mm roof opening, if you are replacing another type already installed, remove the old existing roof vent. Remove all old roof sealant for a minimum of 50mm entirely around the roof opening.
- Place the MAXXFAN into the roof opening and trace a pencil line around it to verify the clean seal area that will be required. Note that the MAXXFAN must be centered in the roof opening with the hinge of the lid facing the front of the vehicle.
|
CAUTION: When installing your MAXXFAN, only use a caulking/sealant compatible with the flange (plastic product) and the roof surface. DO NOT use materials containing solvents such as or similar to Xylene, Toluene, Methyl Ethyl Ketone, Acetate or Acetone as they can damage the flange. Also, Polysulfide (Thiokol) type sealants must be avoided. If in doubt, please contact the manufacturer of your Caravan for further information. |
Step 2
- Prior to installing the MAXXFAN into the roof opening, apply a continuous strip of BUTYL tape or equivalent caulking to the underside of the flange, making sure to cover the screw holes.
| CAUTION: Disconnect main vehicle power before connecting 12 volt DC power to the MAXXFAN! |

Step 3
- Using the insulated 16 gauge electrical connectors provided, connect the vehicle’s 12 volt power to the two MAXXFAN power wires located on the driver’s side of the MAXXFAN.
| CAUTION: Connecting the MAXXFAN to a circuit other than 12 Volts DC or with incorrect polarity could damage the MAXXFAN, cause injury to persons or damage to property and void the warranty. |
NOTE: The MAXXFAN black wire identified with a tag showing (+) must be connected to the vehicle 12 volt (+) positive supply.
Step 4
- Insert the MAXXFAN into the opening with the lid hinge facing the front of the vehicle and centering the MAXXFAN in the opening. Make sure the power wires slide to the interior and do not become entangled. Using the sixteen (16) screws provided, screw the flange to the roof at each raised ring dimple location along the flange. Screw into the dimple to pierce the flange, making sure not to overtighten the screws to avoid cracking the flange.

Step 5
- After the MAXXFAN has been installed, remove the excess caulk that may have squeezed out. Using a sealer such as Dicor self-leveling lap sealant or similar caulking, apply a daub over every exposed screw head. In addition, apply a bead (approximately 5 mm) along the outside edge of the flange all the way around the vent.

Step 6
- The interior Garnish Trim Ring must be trimmed to fit your particular Caravan roof thickness. To accomplish this, measure the distance from the vehicle ceiling surface to each corner of the MAXXFAN Control Plate.
- Most Caravan roofs have some slope, so measuring each corner is necessary. The Garnish ring should be cut 6mm to 12.5mm longer than the dimensions measured at each corner.
- In Picture #6, the installation measures 90mm from the ceiling (this is an example only) to the Control Plate. After adding 12mm as in this example, using a ruler, place a mark at 102mm on each corner of each side of the Garnish Ring (refer to 6A below). Once marked, draw a line connecting all 102mm markers on the outside of the Garnish ring and trim accordingly (refer to 6B below).

| NOTE: DO NOT probe or tamper with the thermostat sensor or IR sensor shown in illustration #6 above. |


Step 7
- Complete the installation by placing any excess wiring to the inside of the roof opening and sliding the Garnish Ring into position. Fasten in place by using the four painted flat head screws provided.

Remote Control Models
- Attach the included cradle to wall with (2) #6 screws provided. Handheld Remote Control may be placed into wall cradle for storage.

MAXXFAN 1 Year Limited Warranty
AIRXCEL, INC. - RV PRODUCTS DIVISION / MAXXAIR Ventilation Solutions warrants to be free of manufacturing defects, regardless of ownership for a period of one (1) year from the original date of purchase. You must keep your original sales receipt. This Limited Warranty does not include “Acts of God,” failure due to misuse, improper installation or accidental / incidental damages. Please call your AIRXCEL / MAXXAIR Distributor if you have any questions or need assistance. Please have your original sales receipt and MAXXFAN Serial Number readily available. This limited warranty does not cover labor or any freight costs for the return of the product to or from AIRXCEL, INC. or costs associated with installation, removal or reinstallation of the product.
- The Serial Number for your MAXXFAN is located on the fan control plate under the round insect screen frame. Actual location may differ from image shown. Reference your operating guide. Rotate the four retaining knobs 180° and remove the screen to view. DO NOT OPERATE the MAXXFAN with the screen removed.

|
CAUTIONS AND CARE OF YOUR MAXXFAN® This product has been manufactured using prime UV stabilized Polymers for maximum toughness and durability. However, the use of caustic or solvent based chemicals can cause cracking and product failure. PLEASE CLEAN ALL PARTS WITH MILD SOAP AND WATER ONLY. Do not use Petroleum Containing Additives or Solvent Based Products on any of the MAXXFAN’s components or its corrosion resistant hardware. LISTED BELOW ARE SOME KNOWN CHEMICAL PRODUCTS TO BE AWARE OF:
GENERALLY COMPATIBLE (But should be used in low concentration where possible)
|
Information and Operating Guide
View Diagram below
|
|

|
CAUTION: Never operate fan with screen removed. When removing screen for cleaning, turn the MAXXFAN OFF and remove the vehicle 12 volt power to the MAXXFAN. When cleaning your MAXXFAN, use only a mild detergent solution. RAIN SENSOR - 4500/4540 MODELS ONLY - If the Rain Sensor circuit detects moisture, it will TURN OFF the fan and close the lid. If ANY key is pressed when the Rain Sensor is still wet, the fan will BEEP THREE (3) TIMES. Press the FAN ON/OFF key to restart the fan after the Rain Sensor has dried. CAUTION: If the lid is opened MANUALLY, the RAIN SENSOR will not close the MAXXFAN lid. CEILING FAN MODE With the fan motor running, close the Vent Lid to enter Ceiling Fan Mode. The fan motor will continue to run and circulate air within the Caravan cabin. SERIAL NUMBER LABEL The serial number label is located underneath the round insect screen. NOTE: The MAXXFAN is designed to be fully opened or fully closed when the vehicle is moving. |
Keypad Controls

ON/OFF:

- Use this key to start the fan or to turn off the fan. On Automatic Opening Models, the lid will also open or close when the fan is turned on or off. On Manual Opening Models, pushing this key while in Auto Mode will exit Auto Mode, turn off the fan and the lid will stay in the position you selected. On Automatic Opening Models, this button will exit Auto mode, turn the fan off, and close the lid.
IN/OUT:

- Use this key to reverse the direction of the fan, the fan will slow down and pause for two (2) seconds before resuming operation in the opposite direction. Note: In Auto Mode the fan direction is automatically positioned to Exhaust, but may be overridden and changed to Intake by depressing this key. Note: Some models are Exhaust Only. On these models this key is deleted.
AUTO:

- Auto Mode allows the thermostat to turn the fan ON and OFF depending on the thermostat setting. Press this key once for less than three (3) seconds to enter Auto Mode, three (3) quick beeps will confirm the MAXXFAN has entered Auto Mode. To EXIT Auto Mode, press the ON/OFF key. Initial factory set point for the thermostat is 26°C. The green LED will light to indicate the MAXXFAN is in Auto Mode. To adjust, follow instructions below: If no previous thermostat temperature was entered, or you wish to change a previous set temperature, press the HOLD TO SET key for more than 3 seconds and you will hear one long beep and the thermostat will be reset to 26°C. To further adjust the set temperature, if desired, use the (+) or (-) Arrow keys to adjust at 0.5°C per press. The fan will emit a beeping sound to confirm this setting. If a previous thermostat temperature was entered, the fan will remember this temperature setting and the next time you enter Auto Mode, the fan will start ventilating automatically as directed by the thermostat. The fan speed will automatically adjust based on the cabin temperature. As cabin temperature rises, the fan increases in speed. Note: If 12 volt Caravan power is removed from the MAXXFAN, the thermostat will be reset to 26°C.
ARROW:

- When in Auto Mode: Use the (+) & (-) Arrow keys to adjust the thermostat set temperature up or down by 0.5°C per press.
- When in Manual Mode: Use the (+) & (-) Arrow keys to adjust the fan speed up or down. When the fan speed reaches either the maximum or minimum speed, the fan will respond with 2 quick beeps to indicate this.
- ARROW KEYS PRESSED TOGETHER: Automatic Lift Models Only Press the (+) & (-) Arrow keys at the same time to Open or Close the lid. The fan motor will remain in its current state.
RAIN SENSOR: 4500/4540 Models Only

- Press this key to turn the Rain Sensor OFF. This will deactivate the Rain Sensor. The red LED will light to indicate that the Rain Sensor is deactivated. Use caution when deactivating the Rain Sensor as rain could enter your Caravan. If the Rain Sensor circuit detects rain, it will turn off the fan and close the lid. The red LED will blink to indicate that the Rain Sensor has shut the fan off. Press the Rain Sensor key again to reset the fan and extinguish the blinking LED. Note: CAUTION: the Rain Sensor will not close the MAXXFAN lid if the lid is opened manually with the knob.
Remote Control Operating Guide
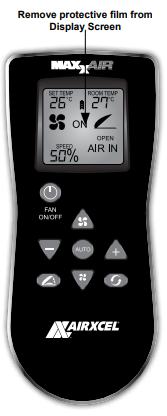
FAN ON & POWER OFF - Press this button:

- To start the fan
- To turn the fan off
- To exit Auto Mode
VENT LID POSITION - Press this button to open or close the vent lid

- While the fan is running in Manual Mode press once to close the vent lid and enter “Ceiling Fan” Mode.
- NOTE: This button is not active in Auto Mode. If the fan loses 12volt Caravan power or power is removed from the fan, use the knob located at the ceiling to manually open or close the vent lid if desired.
AIR EXHAUST / INTAKE - Press this button to reverse the fan from intake or exhaust

- NOTE: In Auto Mode, the fan direction is automatically positioned to Exhaust, but may be overridden and changed to Intake by depressing this key.
FAN AUTO MODE - Press this button to enter Auto Mode

- Auto Mode allows the fan lid to automatically open and the fan motor to operate as dictated by the thermostat set point temperature. Once the cabin temperature cools and reaches the set point temperature, the fan lid will close and the fan motor will shut off.
- Pressing this button while in Auto Mode will shut off Auto Mode, close the vent lid and shut off the fan motor.
THERMOSTAT SET TEMPERATURE
- TEMP + ~ Press this button to increase the Set Temperature for Auto Mode.

- TEMP - ~ Press this button to decrease the Set Temperature for Auto Mode.

- NOTE: The thermostat temperature range is from -2°C to 37°C. To change from Celsius to Fahrenheit on the temperature display, press and hold both set temperature keys simultaneously.
FAN SPEED
- Fan Speed + ~ Press this button to increase the fan speed.

- Fan Speed - ~ Press this button to decrease the fan speed. The fan has ten speeds.

- NOTE: When the fan speed reaches either the maximum or minimum speed, the fan will respond with 2 quick beep sounds to indicate this.
LOW BATTERY INDICATOR

- When the battery is at full charge, three black power bars are displayed.
- One or zero power bars displayed indicates the batteries need replacement.
TRANSMISSION SIGNAL

- This symbol is displayed on the screen when any button is pressed to indicate the signal was transmitted to the fan.
- A beeping sound from the ceiling unit indicates the signal from the remote control was received by the fan
