LG Blu-ray Disc/DVD Player Owner's Manual
Remote Control
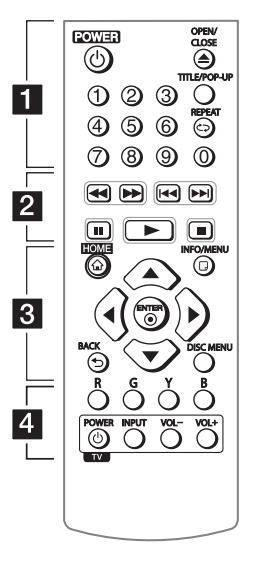 |
1
|
2
|
3
|
4
|
Front Panel |
||
 |
||
| 1. Disc Tray | 3. Remote Sensor | 5. Power |
| 2. Power Indicator | 4. Open/Close | 6. USB Port |
Rear Panel |
|
 |
|
| 1. DC IN 12V (AC Adapter Input) | 2. HDMI Out |
Initial Setup
When you turn on the unit for the first time, the initial setup wizard appears on the screen. Set the display language and network settings on the initial setup wizard.
- Press POWER. The initial setup wizard appears on the screen.
- Use arrow keys to select a display language and press ENTER.

- After checking the Terms of Service, select [Agree] to use the Premium Service and SW Updates. Read and prepare the preparations for the network settings and then press ENTER while [Start] is highlighted.

- All available networks are displayed on the screen. Use Up arrow/Down arrow to select a desired SSID of wireless network and press ENTER.

- Use arrows to select the IP mode between [Dynamic] and [Static]. Normally, select [Dynamic] to allocate an IP address automatically.

- Select [Next] and press ENTER to apply network settings. Network connection status is displayed on the screen.
- Check all the settings that you have set in the previous steps.

Press ENTER while [Finish] is highlighted to finish the initial setup settings. If there is any settings to be changed, use arrows to select the back button and press ENTER.
- Displays the guide to enjoy online contents using LG AV Remote. Press ENTER.

Settings
Adjust the Setup Settings
You can change the settings of the player in the [Settings] menu.
- Press HOME.

- Use Back arrow/Forward arrow to select the [Settings] and press ENTER. The [Settings] menu appears.

- Use Up arrow/Down arrow to select the first setup option, and press ENTER to move to the second level.

- Use Up arrow/Down arrow to select a second setup option, and press ENTER to move to the third level.

- Use Up arrow/Down arrow to select a desired setting, and press ENTER (b) to confirm your selection.
Network Menu
The [NETWORK] settings are needed to use the software update, BD-Live and on-line content services.
Connection Setting
- If your home network environment is ready to connect, the unit needs to be set up via wireless connection for network communication.
Connection Status
- If you want to check the network status on this player, select the [Connection Status] options and press ENTER to check whether a connection to the network and the internet have been established.
BD-LIVE connection
You can restrict Internet access when BD-Live functions are used.
- [Permitted] Internet access is permitted for all BD-Live contents.
- [Partially permitted] Internet access is permitted only for BDLive contents which have content owner certificates. Internet access and AACS Online functions are prohibited for all BD-Live contents without a certificate.
- [Prohibited] Internet access is prohibited for all BD-Live contents.
Smart Service Setting
- [Country Setting] Select your area for displaying proper online content service.
- [Initialize] Depending on the region, [Initialize] function may not be available.
Device Name
- You can make a network name using virtual keyboard. This player will be recognized by the name you are entering on your home network.
Network Play
- This function allows you to control the playback of media streamed from DLNA media server by a DLNA certified smartphone. Most DLNA certified smartphone has a function to control the playback media on your home network. Set this option to [On] for allowing your smartphone to control this unit. Refer to instructions of your DLNA certified smartphone or the application for more detailed information.
Display Menu
TV Aspect Ratio
Select a TV aspect ratio option according to your TV type.
- [4:3 Letter Box] Select when a standard 4:3 TV is connected. Displays theatrical images with masking bars above and below the picture.
- [4:3 Pan Scan] Select when a standard 4:3 TV is connected. Displays pictures cropped to fill your TV screen. Both sides of the picture are cut off.
- [16:9 Original] Select when a 16:9 wide TV is connected. The 4:3 picture is displayed with an original 4:3 aspect ratio, with black bars appearing at the left and right sides.
- [16:9 Full] Select when a 16:9 wide TV is connected. The 4:3 picture is adjusted horizontally (in a linear proportion) to fill the entire screen.
Resolution
Sets the output resolution of the HDMI video signal.
- [Auto] If the HDMI OUT jack is connected to TVs providing display information (EDID), automatically selects the resolution best suited to the connected TV.
- [576p] Outputs 576 lines of progressive video.
- [720p] Outputs 720 lines of progressive video.
- [1080i] Outputs 1080 lines of interlaced video.
- [1080p] Outputs 1080 lines of progressive video.
1080p Display Mode
When the resolution is set to 1080p, select [24 Hz] for smooth presentation of film material (1080p/24 Hz) with a HDMI-equipped display compatible with 1080p/24 Hz input.
HDMI Color Setting
Select the type of output from the HDMI OUT jack. For this setting, please refer to the manuals of your display device.
- [YCbCr] Select when connecting to a HDMI display device.
- [RGB] Select when connecting to a DVI display device.
Home Menu Guide
- This function allows you to display or delete the guide bubble on the Home Menu. Set this option to [On] for displaying guide.
Language Menu
Display Menu
- Select a language for the [Settings] menu and onscreen display.
Disc Menu/Disc Audio/ Disc Subtitle
Select the language you prefer for the audio track (disc audio), subtitles, and the disc menu.
- [Original] Refers to the original language in which the disc was recorded.
- [Other] Press ENTER to select another language. Use number buttons then press ENTER to enter the corresponding 4-digit number according to the language code list.
- [Off] (Disc Subtitle only) Turn off Subtitle.
Audio Menu
Each disc has a variety of audio output options. Set the player’s Audio options according to the type of audio system you use.
Digital Output
- [Auto] Select if you connect this unit’s HDMI OUT jack to a device with LPCM, Dolby Digital, Dolby Digital Plus, Dolby TrueHD, DTS and DTS-HD decoder.
- [PCM] Select if you connect this unit’s HDMI OUT jack to a device with digital decoder.
- [DTS Re-Encode] Select if you connect this unit’s HDMI OUT jack to a device with DTS decoder.
Sampling Freq. (Digital Audio Output)
- [48 kHz] Select this if your A/V Receiver or Amplifier is not capable of handling 192 kHz and 96 kHz signal. When this choice is made, this unit automatically converts any 192 kHz and 96 kHz signals to 48 kHz so your system can decode them.
- [96 kHz] Select this if your A/V Receiver or Amplifier is not capable of handling 192 kHz signals. When this choice is made, this unit automatically converts any 192 kHz signals to 96 kHz so your system can decode them.
- [192 kHz] Select this if your A/V Receiver or Amplifier is capable of handling 192 kHz signals.
Check the documentation for your A/V Receiver or Amplifier to verify its capabilities.
DRC (Dynamic Range Control)
This function allows you to listen to a movie at a lower volume without losing clarity of sound.
- [Auto] The dynamic range of the Dolby TrueHD audio output is specified by itself. And the dynamic range of the Dolby Digital and Dolby Digital Plus are operated as same as the [On] mode.
- [On] Compress the dynamic range of the Dolby Digital, Dolby Digital Plus or Dolby TrueHD audio output.
- [Off] Turns off this function.
[LOCK] Menu
The [LOCK] settings affect only BD-ROM and DVD playback. To access the any features in [LOCK] settings, you must enter the 4-digit security code you have created. If you have not entered a password yet, you are prompted to do so. Enter a 4-digit password twice, and press ENTER to create a new password.
Password
You can create or change the password.
- [None] Enter a 4-digit password twice, and press ENTER to create a new password.
- [Change] Enter the current password and press ENTER. Enter a 4-digit password twice, and press ENTER to create a new password.
If you forget your password
If you forget your password, you can clear it using the following steps:
- Remove any disc that might be in the player.
- Highlight [Password] option in the [Settings] menu.
- Use Number buttons to enter “210499”. The password is cleared.
DVD Rating
Blocks playback of rated DVD based on their content. (Not all discs are rated.)
- [Rating 1-8] Rating one (1) has the most restrictions and rating eight (8) is the least restrictive.
- [Unlock] If you select [Unlock], parental control is not active and the disc plays in full.
Blu-ray Disc Rating
Set an age limit of BD-ROM play. Use number buttons to input an age limit for BD-ROM viewing.
- [255] All BD-ROM can be played.
- [0-254] Prohibits play of BD-ROM with corresponding ratings recorded on them.
Area Code
- Enter the code of the area whose standards were used to rate the DVD video disc.
Others Menu
Quick Start
- This player can stay in standby mode with low power consumption, so that the player can instantly boot without delay when you turn on this unit. Set this option to [On] for activating [Quick Start] function.
Auto Power Off
- The screen saver appears when you leave the player in Stop mode for about 5 minutes. If you set this option to [On], the unit automatically turns off within 15 minutes since the Screen Saver is displayed. Set this option to [Off ] to leave the screen saver until the unit is operated by the user.
How to disconnect the wireless network connection or the wireless device
- Turn off the unit by using the power button.
Initialize
- [Factory Set] You can reset the player to its original factory settings.
- [Blu-ray Storage Clear] Initializes the BD-Live contents from the connected USB storage.
Software
- [Information] Displays the current software version.
- [OSS Notice] LGE Open Source Software Notice is displayed.
- [Update] You can update the software by connecting the unit directly to the software update server
Terms of Service
- Privacy Policy for Blu-ray Disc™ Player is displayed. To use the Premium Service and SW Updates, select [Agree].
Home Menu Display
Using [HOME] menu
The home menu appears when you press HOME. Use Back arrow/Forward arrow to select a category and press ENTER.
 |
||
| 1. Movie: Plays video content. | 3. Music: Plays audio content | 5. Settings: Adjusts the system settings. |
| 2. Photo: Plays photo content. | 4. Premium: Displays the Premium home screen. | 6. Displays related submenu. |
Playing the Linked Devices
Playing a disc
- Press(OPEN/CLOSE), and place a disc on the disc tray.
- Press (OPEN/CLOSE) to close the disc tray. For the most Audio CD, BD-ROM and DVD-ROM discs, playback starts automatically.
- Press HOME.
- Select [Movie] or [Music], and select disc icon.
Playing a file on disc/USB device
This player can play video, audio and photo files contained in the disc or USB device.
- Insert a data disc on the tray or connect a USB device.

When you connect the USB device on the HOME menu, the player plays an audio file contained in the USB storage device automatically. If the USB storage device is containing various types of files, a menu for the file type selection will appear. File loading may take few minutes depending on the number of content stored in the USB storage device. Press ENTER while [Cancel] is selected to stop loading.
- Press HOME.
- Select [Movie], [Photo] or [Music] using Back arrow/Forward arrow, and press Down arrow.
- Select Disc or USB and press ENTER.
 |
||
| 1. Displays all linked devices. | 2. Displays video, photo or audio content. | 3. Displays the file or folder on linked device. |
- Select a file using w/s/a/d, and press (PLAY) or ENTER to play the file.
Notes on USB device
- This player supports USB flash drive/external HDD formatted in FAT32 and NTFS when accessing files (music, photo, movie). However, for BD-Live and Audio CD recording, use the USB flash drive / external HDD formatted in FAT32.
- This unit can support up to 4 partitions of the USB device.
- Do not extract the USB device during operation (play, etc.).
- A USB device which requires additional program installation when you have connected it to a computer, is not supported.
- USB device: USB device that supports USB1.1 and USB2.0.
- Video, audio and photo files can be played. For details of playing each file type, refer to the relevant pages.
- Regular back up is recommended to prevent data loss.
- If you use a USB extension cable, USB HUB or USB Multi-reader, the USB device may not be recognized.
- Some USB device may not work with this unit.
- Some digital cameras and mobile phones are not supported.
- USB Port of the unit cannot be connected to PC. The unit cannot be used as a storage device.
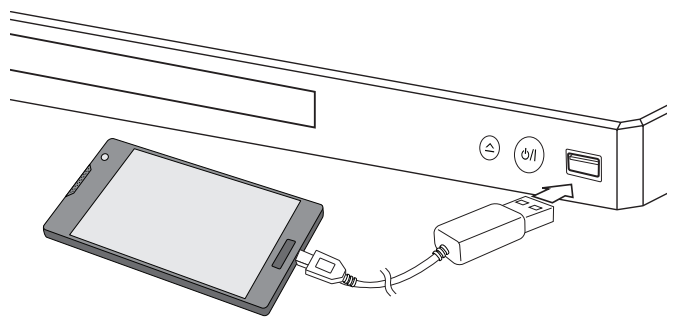
Playing a file on Android device
This player can play video, audio and photo files contained in Android device.
- Connect Android device to the unit with USB cable. Make sure that MTP is activated on Android device.
- Press HOME.
- Select [Movie], [Photo] or [Music] using Back arrow/Forward arrow, and press Down arrow.
- Select [MTP] using Back arrow/Forward arrow and press ENTER.

File loading may take few minutes depending on the number of content stored in Android device.
- Select a file using Arrow buttons, and press (PLAY) or ENTER to play the file.

Notes on Connecting Android device
- This unit can support only MTP (Media Transfer Protocol) Android (4.0 or later is recommended) devices.
- Do not extract Android device during operation (play, etc.).
- Video, audio and photo files can be played. For details of playing each file type, refer to the relevant pages.
- Regular back up is recommended to prevent data loss.
- If you use a USB extension cable, USB HUB or USB Multi-reader, Android device may not be recognized.
- Some Android devices may not work with this unit.
- When you use MTP, playing some music, photo, movie, or subtitle files may not work depending on Android device.
Playing a file on a network server
This player can play video, audio and photo files located in a DLNA-compatible digital media server through your home network.
- Check the network connection and settings.
- Press HOME (1).
- Select [Movie], [Photo] or [Music] using Back arrow/Forward arrow, and press Down arrow.

- Select DLNA media server in the category using Back arrow/Forward arrow and press ENTER.

- Select a file using Arrow buttons, and press (PLAY) or ENTER to play the file.
Using Home Network server for PC
Before connecting to PC to play a file, SmartShare PC Software should be installed on your PC.
About SmartShare PC Software
- SmartShare PC Software is for sharing video, audio and photo files stored on your computer to this unit as a digital media server.
Downloading SmartShare PC Software
- Start up your computer, visit http://www.lg.com. If necessary, select your region.
- Click support tab.
- Fill your model name on the cover of owner’s manual in search bar.
- Find and download the “SmartShare PC Software” file.
Installing SmartShare PC Software
- Before installation, close all running programs including firewall and Anti-Virus programs.
- Unzip and double-click “Setup.exe” to install SmartShare PC Software. The installation is prepared and the installation wizard appears.
- Follow the directions of the installation wizard displayed on the screen.
- Click the [Exit] button to complete the installation.
Sharing files and folders
On your computer, you must share the folder containing video, audio and/or photo content to play them on this player. This part explains the procedure for selecting the shared folders on your computer.
- Double-click the “SmartShare” icon.
- Click [Movie], [Photo] or [Music] icon on the center, and then click [Settings] on the top right corner of the SmartShare PC Software. The [Settings] menu appears on the screen.
- Click [My Shared Contents] tab, and then click icon. The [Add/Remove Shared Folders] menu appears on the screen.
- Click the folder containing the files you want to share and then click the [OK]. The checked folder is added to the [My Shared Contents] and then click the [OK] at the bottom of the [Settings] menu.
- Make sure that the SmartShare service turns on at the [Service] tab.
System requirements
Minimum System
- CPU : Intel® 2.0 GHz or AMD Sempron™ 2000+ processors
- Memory : 1 GB of free RAM
- Graphics card : 64 MB video memory, minimum resolution of 1024 x 768 pixels, and 16 bit color settings
- Free Disk Space : 200 MB
- Windows® XP (Service Pack 2 or higher), Windows Vista®, Windows® 7 or higher
- Windows® Media Player® 11.0 or higher
- Network environment: 100 Mb Ethernet, WLAN
Recommended System
- CPU : Intel® Core™ Duo or AMD Athlon™ 64X2, 1.7 GHz or better
- Memory : 2 GB of free RAM
- Graphics card : 128 MB video memory, minimum resolution of 1024 x 768 pixels, and 16 bit color settings
- Free Disk Space : 200 MB
- Windows® XP (Service Pack 2 or higher), Windows Vista®, Windows® 7 or higher
- Windows® Media Player® 11.0 or higher
- Network environment: 100 Mb Ethernet, WLAN
Troubleshooting
General |
|
| Symptom | Cause & Solution |
| The unit does not work properly. |
|
| The Power does not turned on. |
|
| The unit does not start playback. |
|
| The connected USB storage device is not recognized. |
|
| The angle cannot be changed. |
|
| Cannot play movie, photo or music files. |
|
| The remote control does not work properly. |
|
| The unit is plugged in, but the power will not turn on or off. |
You can reset the unit as follows.
|
| The unit is not operating normally. | |
Network |
|
| Symptom | Cause & Solution |
| BD-Live feature does not work. |
|
| Streaming video services (such as YouTube™, etc.) are often stopped or “buffer” during playback. |
|
| Cannot connect the player to the access point or wireless LAN router. |
|
| Access point is not displayed on the “Access point name” list. |
|
Picture |
|
| Symptom | Cause & Solution |
| There is no picture. |
|
| Picture noise appears. |
|
Controlling a TV with the Supplied Remote Control
You can control your TV using the buttons below.

| By Pressing | You Can |
| Power | Turn the TV on or off. |
| Input | Switch the TV’s input source between the TV and other input sources. |
| Vol +/- | Adjust the volume of the TV |
Setting up the remote to control your TV
You can operate your TV with the supplied remote control. If your TV is listed in the table below, set the appropriate manufacturer code.
- While holding down 1 (TV POWER) button, and press the manufacturer code for your TV with the numerical buttons (see the table below).
| Manufacturer | Code Number |
| LG | 1(Default), 2 |
| Zenith | 1, 3, 4 |
| Goldstar | 1, 2 |
| Samsung | 6, 7 |
| Sony | 8, 9 |
| Hitachi | 4 |
- Release the (TV POWER) button to complete setting.
Depending on your TV, some or all buttons may not function on the TV, even after entering the correct manufacturer code. When you replace the battery of the remote, the code number you have set may be reset to the default setting. Set the appropriate code number again.