14 Plumbing & Bath Features
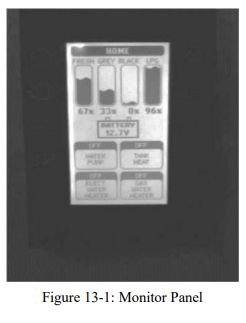
Monitor Panel
The monitor panel (Figure 13-1) permits checking the approximate levels in the fresh, gray, and black water holding tanks; the LP-gas level; and the condition of the battery.
Kitchen Sink
For the sink, cleaning care consists of washing only with mild detergents and water and using a soft cloth for subsequent drying and polishing.

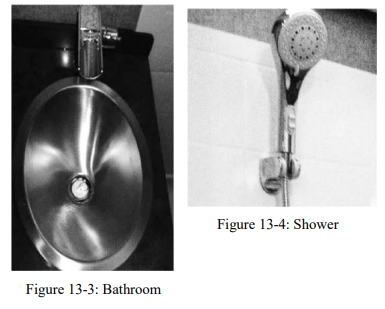
Sink, Shower & Accessories
The typical bathroom accessories include a towel bar and a toilet paper holder. The faucet in the bathroom was chosen to match the specified decor. The tub faucet with showerhead, hose, and bracket are coordinated with the sink faucet.
Water Pump
The water pump is self-priming and totally automatic, operating on demand whenever water is required. The water pump is used to pressurize the freshwater system when the unit is not connected to city water.

To start the pump, follow these instructions:
1. Fill or partially fill the fresh water supply tank
2. Open the kitchen and bathroom faucets. 3. Turn the water pump switch “On” (Figure 14-5) and allow the water to fill water line and hot water heater.
4. Close each faucet after it delivers a steady stream of water (close the cold-water faucet first). Leave the hot water faucets “On” until they also deliver a steady stream of water. This procedure will assure that the water heater is filled with water.
5. The water pump should stop running once all faucets are closed.
6. The water pump is now ready for automatic operation. The pump will run when a faucet is open and stop when a faucet is closed.
7. Never allow the pump to run for long periods of time without water being present in the supply tank, as doing so may cause physical damage or blow fuses.
If water does not flow when a faucet is turned “on” while using the demand system, use the following troubleshooting chart:
SITUATION SOLUTION
Pump running - no water 1. Fill tank
Pump doesn't run 2. Clear the water line to the pump
3. Check the pump switch
4. Check the 12-volt fuses
5. Check the electrical connections
6. Check the motorhome battery
All the water should be drained from the freshwater system when the unit is not in use for extended periods. For more detailed information regarding the water pump, one should refer to the waterpump manufactures brochure.
City Water Connections
When connecting your unit to city water, use the water hose manufactured and labeled for potable water service—this will assure that the hose selected for use will not alter the taste of the water (Figure 13-6).

To connect the city water supply, connect one end of the hose to the city water supply.
Turn the city water supply “on” for a few seconds to clear the line. Once the hose has been flushed, turn the supply “off.” Connect the other end of the hose to the inlet valve on the sewer board; turn the blue handle valve on the sewer board to the city water fixtures turn the red handle valve on the sewer board to normal. (Note: As the water goes through the inlet and then passes through the filter insuring that all water exiting the faucets and showers have been filtered). Once the city water fill valve is opened, water is supplied to the freshwater system including the hot water heater, faucets, and toilet. Turn “on” the water supply and open all of the faucets to clear any trapped air within the plumbing lines within the motor home.
Once any air pockets have purged from the water lines and water flows freely, close all the faucets. The city water supply is pressurized; therefore, the water pump is not needed when the water system of the vehicle is connected to the city water system.
The valves should never be turned while there is pressure on the lines.


FILLING THE FRESH WATER TANK
The freshwater tank is normally filled from the city water inlet on the sewer board. The red and blue handle valves located on the sewer board determine whether the city water is going through the water system or into the freshwater tank.
To fill the fresh water tank, turn the blue handle valve to dry, since there is no automatic shut off when filling the fresh water tank check the water level from the monitor panel while filling the fresh water tank.
All of the water should be drained from the fresh water system when the motorhome is not in use for an extended period of time.
(NOTE: As your freshwater tank fills the water passes through the filter insuring that the water in the freshwater tank has been filtered before use).
All of the water should be drained from the freshwater system when the motorcoach is not in use for an extended period of time.
RUN HOT AND COLD FIXTURES FROM FRESHWATER TANK:
After filling the fresh water you are ready to run the water system from the freshwater tank supply.
1. Turn “On” water pump.
2. On the sewer board turn the blue handle valve to the normal position and turn the red handle valve to the normal position.
SANITIZING HOT AND COLD FIXTURES AND FRESHWATER TANK:
To assure complete disinfecting of the freshwater system, it is recommended that the following procedures be performed on a new system, on one that has not been used for a length of time, or one that may have become contaminated. This procedure is also recommended before long periods of storage, such as during the winter months:
- • Drain the fresh water tank by opening the drain valve (Figure 109.1). All of the faucets should be in the closed position or "OFF" position.
- • Prepare a chlorine solution using one gallon of water and one half cup of chlorine bleach (5% sodium hypochlorite solution). Prepare enough of the chlorine solution to administer one gallon of solution for every 15 gallons of water tank capacity. Concentrations greater than 50 PPMs may damage the water lines and/or the water tanks.
- • Once the fresh water tank is empty, close the drain valves to the water tank.
- • Pour the solution in the gravity fill which is located in the rear of the motorhome.
- • Turn the water pump to "ON", on the sewer board turn the blue valve to "DRY".
- • Open each faucet, in turning "ON" both the hot and cold faucets and flushing the toilet until all of the air has been purged from the pipes and the water runs freely. The entire system will then be filled with sanitizing solution.
- • Allow the 50 ppm disinfecting solution to stand in the system at least four hours.
- • Drain the system and flush it with fresh water. The water system needs to be flushed with water repeatedly if necessary, until there is no chlorine taste or smell in the system. To remove any excessive chlorine taste or odor that might remain,, prepare a solution of one quart of vinegar to five gallons of water. "rock" the water tank containing the solution by moving the motorhome forward and backward several times until the tank is clean. Then drain that water tank and refill with clean water.
SANITIZING HOT AND COLD FIXTURES ONLY (NOT FRESHWATER TANK)
- • All faucets should be in the closed or "OFF" position.
- • Prepare a chlorine solution using one gallon of water and one half cup of chlorine bleach (5% sodium hypochlorite solution). Concentrations greater than 50PPMs may damage the water lines.
- • Connect one end of a vinyl hose to the inlet valve on the sewer board; place the other end of the hose into the solution that has been prepared.
- • Turn "ON" the water pump. On the sewer board turn the blue handle valve to "CITY".
- • Open each faucet by turning "ON" both the hot and cold faucets and flushing the toilet until all of the air has been purged from the pipes and the water runs freely. At this point, all of the water lines will be filled with sanitizing solution.
- • When the sanitizing process is completed, turn the water pump "OFF".
- • Allow the 50 PPMs disinfecting solution to stand in the system for at least four hours.
- • Drain the system and flush it with fresh water. The water lines will need to be flushed with water repeatedly if necessary. Continue to flush until there is no excessive chlorine taste or smell left in the system. To remove any excessive chlorine taste or odor that might remain, prepare a solution of one quart of vinegar to five gallons of water. Repeat steps four, five and six to run the solution through the water lines. Drain the system and flush with fresh water.
Water Filter
This unit is equipped with a water filter (Figure13-7) which must be removed before disinfecting the fresh-water system. First remove the water filter and then replace cover to allow the sanitizing solution access to the faucets. As installed, the filter will remove chlorine, dirt, and other matter. The filter will also eliminate most phenol (or similar) odors and tastes while delivering sparkling, taste-free water for drinking and cooking.

The water filter is located in the sanitation compartment on the drivers side of the motorhome rear most storage compartment. The water filter is not guaranteed to remove the tastes and odors of iron and sulfur. To remove these impurities, you will need to chlorinate the water.
Replacement filters are available that will filter iron and sulfur. Ask your dealer or RV supply center about purchasing an iron and sulfur filter.
If you are traveling in an area where the water has higher than normal iron and sulfur content, then add one tablespoon of chlorine bleach to every 10 gallons of water in your tank - this will precipitate the iron and/or sulfur so that the filter can remove those impurities.
If you are at a site where your motorhome is connected to a city water supply, you will not be able to to chlorinate the system because the water flows straight to your faucets and not through the fresh water tank.
Filters should be changed every six to twelve months depending on the quality and quantity of the water that is used in your motorhome.
Water Heater Bypass System
This process is performed when winterizing your motorhome. This process will keep antifreeze out of your water heater when winterizing your motorhome. Please follow the manufacturers specific directions for winterization process.
Draining the water heater during winterization is a MUST.

BYPASS WATER HEATER FOR MAINTENANCE
This procedure is used for any maintenance that may be done to the water heater. On the sewer board turn the blue handle valve to the city fixture position and turn the red handle valve to the bypass position. (NOTE: You will still be able to use your faucets and showers if necessary but it can only be done with pressurized city water and will only receive cold water).
Freshwater Lines
Check all of the plumbing connections for leaks at least on an annual basis.
If the water pump runs when all faucets are turned “Off,” check for a possible leak. Be sure that the drain valves are closed. Connections at the kitchen and bathroom faucets normally seal by hand-tightening them and then making an additional half-turn with a wrench.
If a fitting leak persists, disconnect it completely and visually inspect it for mineral deposits or foreign material stuck on the sealing surfaces. Clean the surfaces thoroughly and reinstall the fitting.
General Information
The waste drainage system was designed to provide adequate and safe storage and/or disposal of waste materials. All the materials used in the fabrication of this system are tested by a nationally recognized testing laboratory.
The drainage system uses plastic piping and fittings connected to the sinks, toilet, and holding tanks. This plumbing permits the drainage of these fixtures to an outside termination. The vehicle should be reasonably level for best operation of both wastewater systems.
There are two, separate wastewater systems. The gray-water system is for wastewater from the sinks and shower. The black-water system is for sewage waste from the toilet. Each wastewater tank has its own control valve, and both drain through a common sewer-drain hose.
Toilet
The toilet (Figure 13-9) operates with water from either the fresh water tank with the water pump “on” or the city water supply. Before using the toilet, add water to the bottom of the tank. Refer to the “BLACK WATER TANK” instructions.
The toilet flushes waste directly into the black water holding tank. It is imperative that you use as much water as possible when flushing to prevent tissue and other solids from clogging the holding tank outlet.

When using your toilet, fill the toilet 3/4 full of water. To add water to the toilet bowl, push the pedal level 1/4 of the way down until the desired level of water is reached. To flush the toilet, push down on the toilet lever until the waste swirls. A small amount of water should remain in the bowl.
The toilet should be cleaned regularly for maximum sanitation and operational efficiency. Clean the toilet bowl with a mild bathroom cleaner.

Black Water Holding Tank
The “black water” (i.e., sewage) holding tank is located directly beneath the toilet. Before using the toilet, you will need to treat the tank with water that is mixed with an odor-controlling chemical. These chemicals are readily available at any RV supply store.
Pull the toilet levers forward to allow the chemicals to mix with the toilet water. Continue pulling the toilet levers until a depth of at least one inch of solution is directly under the toilet.
Release the levers and the waste tank is now ready for use.
Gray Water Holding Tank (P-Traps)

It is important that you use as much water as possible each time you flush the toilet. This will help prevent tissue and other solids from clogging the holding tank outlet.
The gray-water holding tank is located in the underbelly of the vehicle. It is primarily used for the drainage from the kitchen and bath sinks and the shower.
P-TRAPS -- Each of the sink drains and the shower drain has a water trap (P-trap) to prevent holding-tank odors from entering the vehicle. These traps must have water in them to trap odors. When the vehicle is in motion, the water may splash out of the sink and shower drains.
When the vehicle is stored, the water may evaporate from these traps allowing odors to enter the vehicle. If this occurs, run water from the faucet into the drain, allowing water to fill the traps again.
Wastewater Disposal
Both holding tanks terminate in a valve arrangement that permits draining each tank separately or together. It is recommended to drain the black water tank first before draining the gray water tank. This procedure permits the water from the gray tank to wash the black-water residue from the drain lines.

The valves that open to release the water are called gate valves. The blade that closed the opening in the sewer drainpipes is connected to the T-handle to release contents of the tank(s) when pulled. The sewer line must be securely capped during self-containment use to prevent leakage of waste materials. Do not pull the holding tank gate valve “open” when the protective cap is installed on the pipe.
Always drain the tank into an acceptable sewer inlet or dump station. Whenever possible, drain both the holding tanks prior to traveling. The carrying capacity of your vehicle will be reduced if water is left in the black or gray tanks. The holding tanks should only be drained when they are at least ¾ full. Doing this will provide a sufficient volume of water to allow the complete flushing of waste materials in the drain lines and hose. If the tanks are not ¾ full, add enough water to allow for sufficient flushing.
To empty the wastewater tanks, connect the adapter, supplied with your vehicle, to the drain hose. Unscrew the cap from the drain. Connect the hose, with the adapter in place, to the drain fitting. Open the gate valve completely by pulling on the T-handle. The tank will start to drain as soon as the T-handle is pulled. After you have drained the black-water tank, immediately drain the gray-water tank. This procedure helps to flush the black water from the sewage hose. When both the tanks are empty, flush them with a freshwater rinse before you close the valves. The gray tanks are easily flushed by pouring a couple of gallons of water into a sink drain. The drain outlet is engineered for quick release of the drain hose adapter. Always close the gate valves and secure the end cap to prevent leakage while the vehicle is in transit.
After draining the black water tank, it is recommended to add a holding tank deodorant to help control the odor and break down the solids. Follow the instructions given on the holding tank deodorant package.
Sewer Connection and Camping
While using the motorhome, it is always important to keep the black-water holding-tank gate valve closed, except when dumping. This allows an ample amount of liquid to remain in the tank to provide a smooth flow through the gate and drain valves when dumping.
Sufficient liquid in the tank causes a swirling action that should take any accumulated solid wastes with it. Accumulation of solid wastes in the black water tank can be avoided by keeping the gate valve closed when connected to the sewer connection. The gray tank can be kept open while hooked to a sewer connection.
NOTE: When dumping, it is suggested to dump the black tank first, then the gray.
No Fuss Flush
This vehicle may be equipped with a flushing system for the black-water holding tank. When draining your sewer tank, attach a water hose to the sewer spray connection. After the tank is drained, leave the gate valve “open” and open the water valve to allow water to spray inside the black-water tank.
This will clean the inside of the tank of any debris that may be left inside the tank. After this procedure is done, disconnect the freshwater hose and close the gate valve.

Be sure the gate valve is “open” when flushing the tank. Do not use the same hose for the No Fuss Flush that is used for filling the fresh water tank.
Exterior Shower
Your Wayfarer motorhome has an exterior shower for your use and convenience outside the motorhome (Figure 116.1).
The exterior shower is located in the service compartment on the drivers side and allows you to do such things as rinse off sand or grass, muddy shoes or to bathe outside of your motorhome.
The faucet operates just as it would in your kitchen or bathroom.
